How to Clean Rubber Plant Leaves: 8 Proven Methods for Healthy Shine
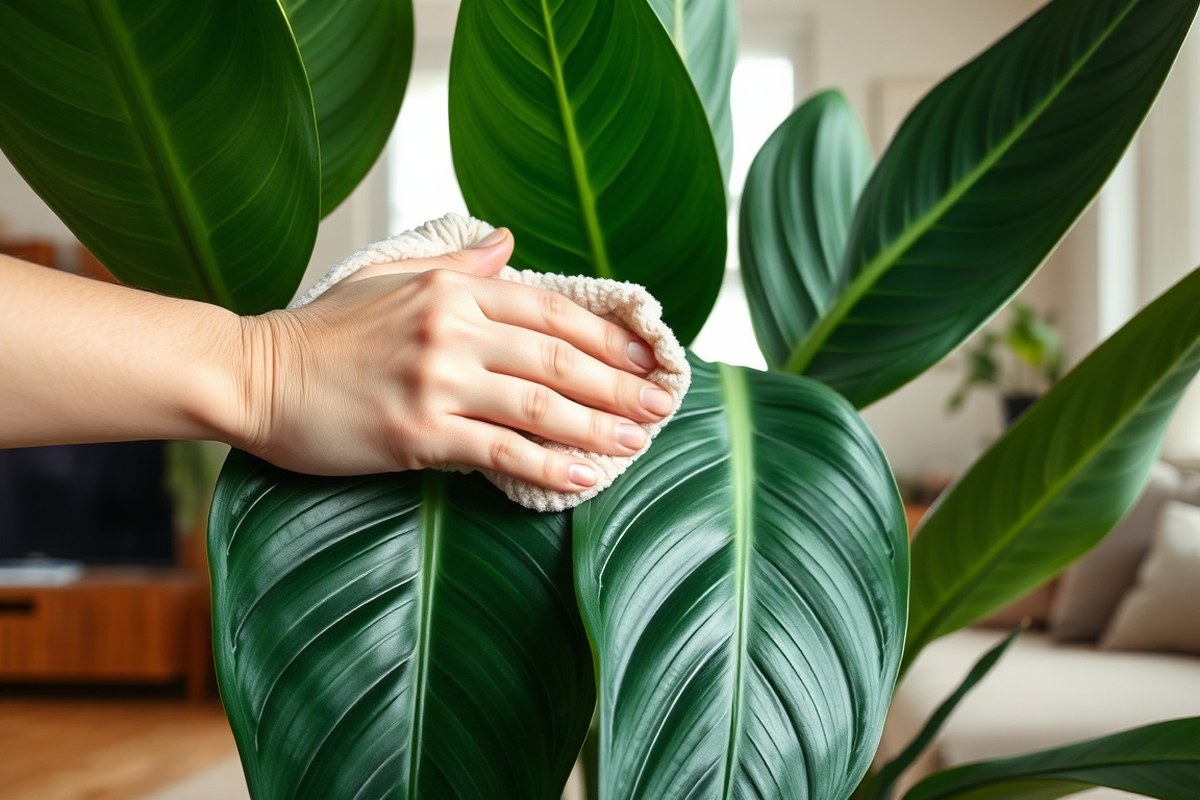
How to clean rubber plant leaves involves gentle wiping to remove dust and grime. Use a soft cloth dampened with water or a mild soap solution. Avoid harsh chemicals that can harm the leaves or block their natural pores.
Start by placing your rubber plant in bright, indirect sunlight for better cleaning results. Wiping the leaves regularly helps them photosynthesize well, keeping your plant healthy. Be careful not to overwater or spray too much, which can cause leaf damage.
Cleaning every 2 to 4 weeks is usually enough to protect the leaves from buildup. In low-dust homes, you might stretch that to every 2 or 3 months. Consistent leaf care boosts your rubber plant’s shine and overall vitality.
Key Takeaways
- Use a soft, damp cloth with plain water or mild soap for cleaning.
- Place your rubber plant in bright indirect sunlight before cleaning.
- Clean rubber plant leaves every 2 to 4 weeks for best health.
- Avoid harsh chemicals to prevent leaf damage and pore blockage.
- Don’t soak or spray leaves excessively to protect their natural oils.
- Wiping removes dust that can reduce photosynthesis by up to 25%.
1. How to Clean Rubber Plant Leaves Safely and Effectively

Cleaning rubber plant leaves gently helps keep your plant healthy and bright. Use lukewarm water to avoid shocking the leaves or damaging their waxy coating. Cleaning both sides of the leaves is best since dust settles on the undersides, too.
Prepare a soft, damp cloth or sponge for wiping the leaves. Avoid harsh scrubbing or spray bottles, which can bruise or stress the plant. Follow the steps below for a safe and effective cleaning routine.
- Lay down a towel or work over a sink to catch drips.
- Dip a soft cloth in lukewarm water, then wring it out well.
- Gently wipe the top surface of each leaf, holding the leaf steady.
- Flip the leaf carefully and wipe its underside with the same cloth.
- Rinse the cloth frequently and refresh it with clean water.
- Check for stubborn spots and wipe softly until clean.
- After wiping all leaves, let your plant air dry in a warm spot.
- Clean leaves every 2 to 4 weeks or whenever they look dusty.
Lukewarm water means about 75 to 85 degrees Fahrenheit. This warmth cleans leaves gently, protecting their waxy coating and oils. Cold water risks shocking your plant, and hot water could cause burns.
Cleaning both sides of rubber plant leaves helps them absorb more light and improves air flow. It also removes more dust and allergens that build up beneath the leaves. This care lets the plant breathe and photosynthesize better, which keeps it vigorous and glossy.
2. How Often Should You Clean Your Rubber Plant Leaves?

Cleaning rubber plant leaves once a month works well for most homes. This schedule removes dust and debris that block sunlight, helping your plant photosynthesize better. When you spot dust on leaves, gently wipe with a damp cloth.
Environments with more dust or pet hair need more frequent cleaning. Your home’s dryness or dust may need leaf wiping every two weeks.
In humid spots, less frequent cleaning may work since moisture prevents dust buildup. But watch for leaf spots or mold and clean carefully if needed.
Season changes can also affect how often you clean. In spring and summer, your plant grows faster and may need cleaning every few weeks. Winter usually brings less indoor airflow, causing dust to settle more.
So monthly cleaning helps keep leaves free of buildup. Clean both the top and bottom of leaves.
This helps plants stay healthy. It also keeps leaves shiny and looking great.
Use a gentle touch and a soft cloth when wiping leaves to avoid damaging their surface.
3. Essential Supplies and Safe Cleaning Solutions for Leaf Care
To clean rubber plant leaves, you need simple supplies like a soft cloth and mild cleaners. Avoid harsh chemicals that can harm the leaves. Use homemade mixtures carefully and rinse well afterward to protect your plant.
Basic Cleaning Supplies Checklist
Start with a soft microfiber cloth to prevent scratching the leaves. Have a spray bottle filled with room temperature water for rinsing. Keep mild liquid soap handy for making gentle cleaning solutions.
Here’s a quick list for your rubber plant leaf cleaning:
- Soft microfiber cloth or sponge
- Spray bottle with clean, lukewarm water
- Mild liquid soap (like dish soap with no added bleach)
- Baby wipes (unscented and alcohol-free)
- Sponge or soft brush for stubborn dirt
- Bowl or bucket for mixing solutions
- Towels to catch drips and protect your floor
Having these supplies ready makes leaf cleaning smooth and safe for your rubber plant.
Preparing Mild Soap or Natural Cleaning Solutions
Mix a small amount of mild liquid soap with water to make a gentle cleaning spray. Use about one teaspoon of soap per quart of water. This keeps the solution light enough not to stress the leaves.
You can add one tablespoon of white vinegar per quart of water. This creates a natural mix for your rubber plant. Use it carefully to avoid harm.
Always spray the solution on the cloth first, not directly on the leaves, to control moisture. After cleaning, wipe the leaves with plain water to remove any soap or vinegar residue.
Products to Avoid or Use with Caution
Many commercial leaf shine products contain chemicals that can harm rubber plant leaves. They may clog pores or cause spots. It’s best to avoid these products or test on one leaf first.
Baby wipes can work in a pinch but choose unscented, alcohol-free types to reduce risk. Try the wipes on one leaf first. Watch that leaf for 24 hours.
Check for any color changes or damage during that time. Avoid wipes with added lotions or fragrances.
Never use harsh chemical cleaners, bleach, or anything abrasive. These can damage the leaf surface and reduce your plant’s ability to photosynthesize properly.
4. Comparing 8 Cleaning Methods for Rubber Plant Leaves
Cleaning rubber plant leaves works best with methods that fit your plant size and your time. For small plants, wiping with a damp cloth gets into leaf creases easily without fuss. Bigger plants need showering to rinse off dust and dirt quickly.
It cleans without touching every leaf one by one. This method saves time and keeps leaves healthy.
Misting is a good regular habit but does not remove stickiness or stubborn dirt. Some prefer using a special leaf cleaner, but plain lukewarm water is usually enough. Avoid harsh soaps or alcohol, which can harm the leaves.
| Method | How to Do It | Best For | Pros | Cons | Time & Cost |
|---|---|---|---|---|---|
| Damp Cloth Wiping | Gently wipe leaves with soft cloth & lukewarm water | Small to medium plants | Safe on leaves, reaches leaf edges | Time-consuming for large plants | 10-20 min, no cost |
| Showering the Plant | Spray or shower leaves with lukewarm water evenly | Large plants | Quick, lifts most dust & dirt off | Needs a Drainage-safe spot | 5-10 min, no cost |
| Misting Leaves | Lightly spray water on leaves regularly | All sizes for regular maintenance | Hydrates leaves, helps with light dirt | Does not clean sticky or heavy dirt | 2-3 min daily, cost of spray bottle |
| Leaf Cleaning Sprays | Apply plant-safe cleaner per instructions | All sizes | Can remove residue and dust effectively | Cost, potential leaf sensitivity | 10 min, $5-$15 per bottle |
| Soft Brush Dusting | Brush leaves gently with a soft brush | Small and delicate leaves | Reaches tight spaces, no water needed | Less effective on sticky dirt | 5-15 min, low cost |
| Compressed Air | Blow leaves with low-pressure air | Hard-to-reach leaves | Dust removal without water | Can blow dirt onto other plants | Few minutes, needs equipment |
| Leaf Soaking | Soak leaves in lukewarm water briefly | Small leaves or detached leaves | Softens dirt, very thorough | Not practical for large plants | 10 min plus drying time |
| Newspaper Polishing | Rub clean newspaper gently on leaves | Small and dry leaves | Affordable, quick shine | Limited dirt removal, risk of tearing | 5-10 min, low cost |
Using the right method depends on your plant’s size and leaf condition. Wiping suits smaller plants or when you want to check leaves closely. Showering works best around sinks or tubs for big plants that need a fast clean.
Regular misting keeps leaves fresh but does not replace wiping or showering. Leaf sprays can help if your plant has sticky residue. Use a soft brush or compressed air to clean leaves safely.
This works well when water can harm plants. Delicate leaves and winter months need this care.
5. Dealing with Sticky Residue, Hard Water Spots, and Stubborn Dirt
Sticky residue, hard water spots, and tough grime can harm your rubber plant’s leaves. Removing them gently keeps the leaves healthy and shiny. Use the right cleaning steps and solutions to avoid damage.
Identifying Sticky Residue Types
Sticky residue on rubber plant leaves may come from sap or pests. Dust mixed with moisture can also cause sticky spots on leaves.
Sometimes, airborne particles stick to wet leaves, creating a sticky film. Hard water leaves mineral spots that look white or chalky on the leaf surface.
Recognizing the residue type helps you pick the best cleaning method. Sap or pest residue may need a gentle soap solution. Hard water spots usually respond to plain water or vinegar.
Safe Step-By-Step Cleaning for Sticky Leaves
Removing sticky residue requires mild cleaning without harsh scrubbing. Start by mixing a gentle soap solution to avoid hurting the leaf surface. Avoid strong detergents or leaf-wilting chemicals.
- Fill a bowl with warm water and a few drops of mild dish soap.
- Dip a soft cloth or sponge into the soapy water and wring it out.
- Gently wipe the top and bottom of each leaf to loosen grime and residue.
- For sticky sap, use light circular motions, not heavy scrubbing.
- Spot hard water stains by dipping a cloth in equal parts water and vinegar.
- Wipe the spots carefully with the vinegar mixture, avoiding prolonged leaf contact.
- Use a clean, damp cloth to go over the leaves again and remove loosened residue.
Never soak rubber plant leaves; excess water can cause leaf damage or disease.
Rinsing and Drying After Residue Removal
Always rinse leaves thoroughly with clean water to clear soap or vinegar traces. This step stops any leftover cleaner from harming the leaf’s surface or altering its texture.
Use a spray bottle with plain water to rinse off detergent or vinegar. You can also wipe leaves with a damp cloth dipped in plain water.
Pat each leaf dry gently using a soft towel after rinsing. You can also let leaves air dry in a warm spot.
6. Mistakes to Avoid When Cleaning Rubber Plant Leaves
You should never use food oils like olive oil to shine rubber plant leaves. These oils clog leaf pores, which harms the plant’s ability to breathe. Instead, stick to mild soap and water with a soft cloth to keep leaves healthy.
Harsh chemicals and cleaning sprays often contain alcohol or detergents that can damage the leaf surface. This damage shows up as brown spots or a dull, rough texture. Use a gentle cleaner specifically made for delicate leaves to avoid this.
Over-wetting is another common mistake. Rubber plant leaves don’t like soaking, which can lead to fungal problems. Lightly dampen the cloth instead of spraying water directly on the leaves to control moisture.
- Never apply oils or leaf shine sprays; they block pores.
- Use only mild soap designed for delicate leaves.
- Wipe leaves gently with a soft microfiber cloth.
- Do not soak leaves; use a damp cloth, not a spray.
- Avoid harsh chemicals that cause spots and dullness.
- Clean leaves in a shaded area to prevent water spots.
- Test any cleaner on one leaf first to avoid damage.
Soft cloths prevent scratches or tearing on your rubber plant leaves. Rough cloths or scrubbing pads wear down the leaf’s surface and cause faded patches. A microfiber cloth costs around $5 but makes safe leaf cleaning easier.
You can clean rubber plant leaves indoors or outside on a mild day. Make sure you avoid direct sunlight during cleaning to stop water spots from forming. After wiping, let the leaves dry naturally; avoid using heat or forced air.
7. Seasonal and Environmental Factors Affecting Leaf Cleaning
Sunlight affects how often you need to clean rubber plant leaves. In brighter spots, leaves photosynthesize more and may gather dust faster. Clean them every one to two weeks in summer to keep them shiny and healthy.
In winter, sunlight is weaker and shorter, so dust builds up more slowly. You can reduce cleaning to once a month.
Dry heated air indoors can also make leaves lose moisture faster. So wipe them gently to avoid stress.
Humidity level changes how dust sticks to your rubber plant. Low humidity makes dust cling loosely, so a soft brush or dry cloth helps. High humidity causes dust and dirt to stick tight, needing a damp cloth or mild rinse.
Rooms with poor air circulation or near windows gather dust quicker. Keep the plant away from vents that blow dry or dusty air directly. Wiping leaves regularly in these spots stops buildup and helps your plant breathe better.
Seasonal changes mean adjusting your cleaning routine. Summer’s heat and light speed up dust collection and water loss, so check leaves often.
Winter’s cooler, darker air slows growth and dust. But dry heat inside can stress leaves if not cleaned carefully.
Cleaning with lukewarm water works well year-round to avoid shocking leaves. Use a soft cloth or sponge and wipe each leaf’s top and bottom gently. Avoid soap in dry winter air; plain water keeps leaf pores clear without residue.
8. When to Inspect and Call a Professional for Leaf Issues
Check your rubber plant’s leaves right after cleaning to spot damage or pests early. Damaged leaves or visible pests need quick attention to avoid worsening problems. Knowing these signs helps you decide if you can treat the issues or need expert help.
Signs of Cleaning Damage on Rubber Plant Leaves
Cleaning damage often shows as bruises, brown spots, or torn edges on leaves. These happen if you use harsh scrubbing, rough cloths, or too strong cleaning solutions. Leaves might also look dull or dry if over-cleaned or wiped too hard.
Light damage can heal, but severe spots usually don’t recover. Check for wrinkles or saggy leaves after cleaning.
These signs show your plant might be stressed. Avoid stronger soaps or scrubbing harder next time if you see these issues.
Indicators of Pest Infestation or Disease
Sticky residue or tiny webs on leaves often mean pests. Small moving dots can be aphids or spider mites.
Yellow spots or patches might show disease or pest damage. These problems spread fast and can harm plant health.
Here’s a quick checklist to spot early signs of pest or disease problems during cleaning:
- Sticky or shiny patches on upper and lower leaf surfaces
- Tiny, powdery webs nestled in leaf joints or under leaves
- Yellow or brown spots spreading across leaves
- Small insects visible on leaves or stems
- Leaves curling, wilting, or dropping unexpectedly
- Black or white powdery residue on the surface
Finding any of these early lets you treat the problem before it spreads. Neem oil or insecticidal soap helps most pests. You can safely apply them yourself at home.
Steps Before Seeking Professional Help
Before calling a pro, try to isolate the plant to stop pests from spreading to others. Clean leaves gently using a mild soap and rinse them well.
Wipe leaves with a soft cloth dipped in water. Add a few drops of neem oil or soap.
Monitor your plant for at least a week after treatment. See no improvement or worse damage?
Contact a professional gardener or plant doctor. They can diagnose diseases and pest issues more precisely and recommend stronger treatments.
Don’t delay calling a pro if you see rapidly worsening leaf damage or many pests.
Step-by-Step Action Plan for Cleaning Rubber Plant Leaves
Follow these simple steps to keep your rubber plant leaves clean and healthy. This plan helps you avoid common mistakes and get great results.
- Before you start: Gather soft cloth, mild soap, and lukewarm water. Check your supplies match safe cleaning options.
- Day 1: Gently wipe each leaf with a damp cloth. Leaves should look shiny and dirt-free afterward.
- Week 2: Inspect leaves for any sticky residue or spots. Use diluted vinegar on tough spots if needed.
- Month 1: Spray leaves with water to rinse off dust between cleanings. This keeps leaves fresh without harsh scrubbing.
- Every 4-6 weeks: Repeat gentle wiping with soap solution. Make sure no soap residue stays on leaves.
- Seasonal check: Increase cleaning frequency if your home is dusty or dry. Watch for changes in leaf color or health.
- After any pest issues: Clean leaves to remove honeydew or pests. Call a professional if damage looks severe or spreads fast.
Frequently Asked Questions
Can I Use Commercial Leaf Shine Sprays on Rubber Plant Leaves?
Commercial leaf shine sprays can clog pores and harm leaves. It’s better to use a damp cloth or mild soapy water for cleaning.
What Temperature Should the Water Be When Cleaning Rubber Plant Leaves?
Use lukewarm water to clean rubber plant leaves safely. Cold or hot water may shock or damage the leaf surface.
Can I Use Vinegar to Remove Hard Water Spots on Rubber Plant Leaves?
A mild vinegar solution helps remove hard water spots, but dilute it well. Test first on a small area to avoid leaf burn.
Should I Clean Rubber Plant Leaves Outdoors or Indoors?
Cleaning indoors prevents plant stress caused by cold or wind. Ensure good ventilation and moderate light while wiping the leaves.
Is It Okay to Use a Sponge Instead of a Cloth for Cleaning Leaves?
A soft cloth is best because it’s gentle on the waxy leaf surface. Sponges can be too rough and cause scratches.
Can I Wash My Rubber Plant Leaves in the Shower?
Yes, a gentle shower rinse can clean leaves well without harsh rubbing. Use lukewarm water and avoid strong sprays to protect leaf health.
Final Thoughts
Cleaning rubber plant leaves makes your plant healthier and more attractive. Start with a simple wipe-down and watch your plant shine. Next, check your leaves regularly to catch dirt and pests early.