How to Grow Potatoes in Water: A Complete Guide with Proven Tips
Growing potatoes in water is simple with a healthy potato, clean water, and sunlight. This method avoids messy soil and lets you see roots and sprouts clearly. It’s a cleaner, easier way for beginners.
Start by rinsing your seed potato and soaking it in water for one day. Use filtered or settled tap water and keep it between 65°F and 75°F. This temperature range encourages better sprouting.
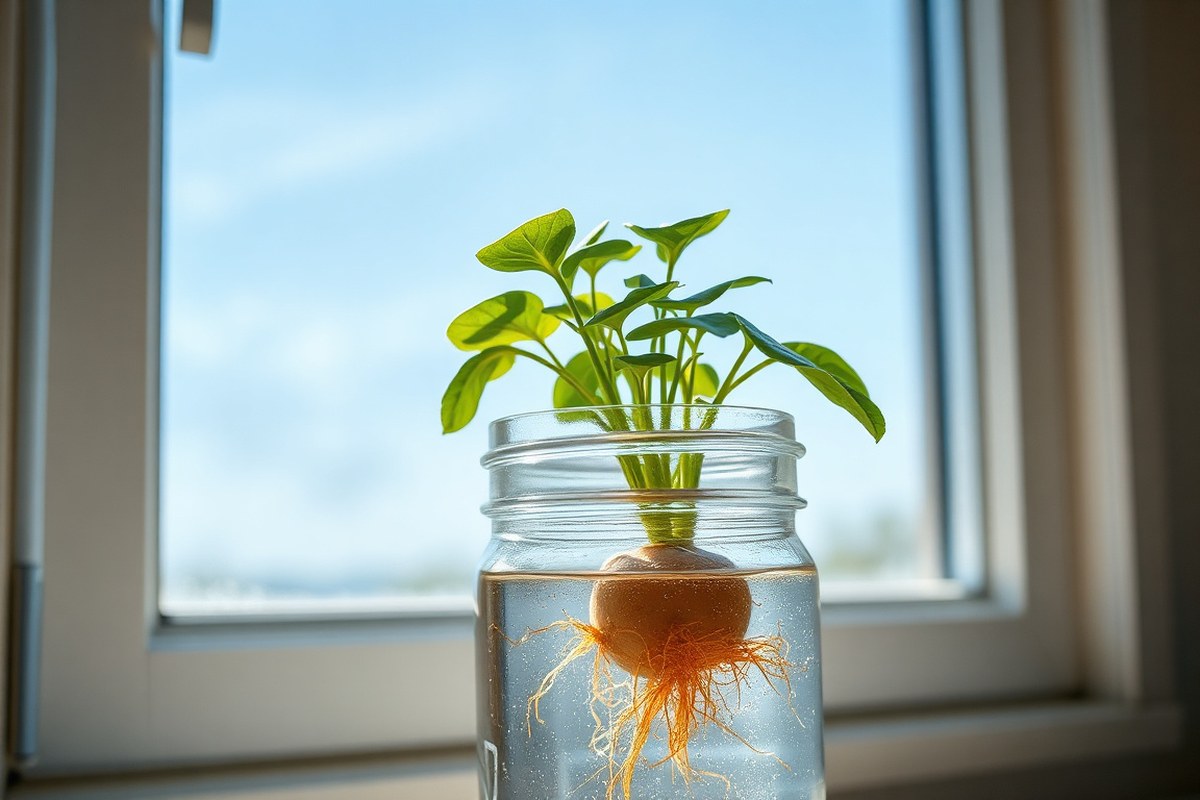
Place the potato in a jar so the bottom touches the water but the top stays dry. Roots and leaves should appear in 1 to 2 weeks. Move the jar to get 6 to 8 hours of sunlight daily for healthy growth.
Key Takeaways
- Use a whole or cut seed potato with at least one eye for planting.
- Let tap water sit for 24 hours to remove chlorine before using.
- Keep water temperature between 65°F and 75°F for best growth.
- Change water every few days to prevent rot and bacteria buildup.
- Give the potato 12-16 hours of light daily to encourage growth.
- Support sprouting roots with toothpicks to keep the potato stable.
How to Grow Potatoes in Water Step-by-Step
Growing potatoes in water needs a clear plan and steady care. You start by choosing a healthy potato with several “eyes” or sprouts. Positioning the potato right in the water is key to help roots and shoots grow quickly.
The best way to grow potatoes in water involves a few straightforward steps. You’ll need a container, water, and a sunny spot.
Place the potato so its bottom third dips into water. Keep the eyes facing up, above the water surface.
- Fill a clear container with water up to about one-third full.
- Insert toothpicks spaced evenly around the potato’s middle to suspend it.
- Place the potato so the end with the most eyes points upward above water.
- Make sure the bottom third of the potato stays submerged in water.
- Put the container in a warm, sunny spot to encourage growth.
- Refresh the water every few days to maintain cleanliness and oxygen. This helps the potato stay healthy.
- Watch for roots growing downward into the water; shoots will sprout upward.
- Maintain the water level so roots stay covered but the tuber doesn’t drown.
Roots usually start showing in about 1 to 2 weeks. Shoots form soon after, growing skyward from the eyes. Keep the water clean to prevent rot.
Let the potato stay partly out of water. This stops it from getting soggy.
Successful growth looks like healthy white roots sinking into the water. Shiny green shoots sprouting from the eyes mean the potato is alive and thriving. Avoid full submersion to prevent soft rot, which ruins the process.
Choosing and Preparing Potatoes for Water Growth
Choose potato varieties with multiple healthy eyes and disease resistance for water growing. Cut big tubers into pieces with two or three eyes each. Let them air-dry for 24 to 48 hours.
This helps them cure well before planting. Clean seed potatoes gently to remove soil and prevent rot when submerged in water.
Best Potato Varieties for Water Growing
Look for certified seed potatoes specially bred for planting to reduce disease risks. Varieties like Yukon Gold, Red Norland, and fingerling types respond well to water growth. These tubers have strong eyes and grow faster.
They usually mature in 60 to 90 days after planting. This speeds up your harvest.
Choose potatoes with firm skin and no signs of damage or rot. Avoid store-bought potatoes treated with sprout inhibitors. Seed potatoes bought from garden centers or online sources are more reliable for success.
How to Cut and Cure Seed Potatoes
When cutting large seed potatoes, make sure each piece has two or three eyes. This ensures sprouts develop multiple stems and tuber clusters. Use a sharp, clean knife to avoid bruising the tubers during cutting.
Allow the cut pieces to air-dry in a cool, shady spot for 24 to 48 hours. This curing process forms a protective scab layer that helps prevent rot in water. Do not rush this step to avoid soggy or rotting pieces later.
Cleaning and Handling for Healthy Growth
Rinse seed potatoes with cool water to remove soil and loose debris. Gently pat them dry before planting. Keeping potatoes clean reduces fungi and bacteria that cause rot in standing water.
Handle tubers carefully to avoid bruises or cuts, which invite decay. Change the water regularly to maintain freshness and oxygen levels. You might try using filtered water for better results.
It keeps your container cleaner and reduces buildup. This helps your potatoes grow healthy.
- Choose certified seed potatoes with multiple eyes
- Cut pieces with at least two or three eyes each
- Cure cut pieces 24 to 48 hours in a dry, shaded place
- Rinse gently to remove dirt and prevent fungi growth
- Handle tubers carefully to avoid damage and rot
- Use clean, filtered water and change it regularly
Never plant potatoes with damaged or soft spots; they often rot quickly in water.
Setting Up the Ideal Water Environment for Potato Growth
Use clean, room-temperature water with proper pH and oxygen for potato growth. Keep the environment steady by changing water often and managing temperature. These steps help avoid rot and encourage healthy sprouts and roots.
Water Quality and pH Maintenance
Tap water that’s free from chlorine and heavy minerals works best. Let water sit for 24 hours to let chlorine evaporate before use. You can use filtered water for your plants indoors.
Distilled water works well too. Use these if your tap water is hard or has additives.
Keep the pH between 5.5 and 6.5. This slightly acidic range helps potatoes absorb nutrients and avoid disease. Check the water’s pH every few days with a test kit.
Use vinegar to lower the pH. Add baking soda to raise the pH when needed.
- Let tap water rest 24 hours to remove chlorine
- Use filtered or distilled water if water quality is poor
- Test pH twice a week with a test strip or meter
- Adjust pH with white vinegar (to lower) or baking soda (to raise)
- Keep water free from visible dirt or debris
- Use clean containers thoroughly rinsed before use
Clean containers and fresh water reduce harmful bacteria and algae. Avoid using softened water because high salt harms potato roots and slows growth.
Temperature and Oxygenation Tips
Maintain water temperature between 65°F and 75°F (18°C to 24°C). Water this warm supports steady root and sprout growth. Temperatures outside this range can stunt the plant or promote disease.
Oxygen in water is critical. You can add an air stone or small aquarium pump if roots stay fully submerged.
This moves oxygen into the water and keeps roots healthy. Without enough oxygen, roots might rot or weaken.
Keep water containers out of direct sunlight to avoid overheating. A steady temperature also reduces stress on the plant. Let the air around the potato stay warm and humid but not steamy.
Water Replacement Schedule
Change the water every three to five days, depending on growth speed and water quality. Frequent changes prevent bacteria and fungi buildup. Replacing water keeps oxygen levels higher and removes waste from the growing potato.
Change the water right away when it turns cloudy or smells bad. This signals bacterial growth that can kill the sprouting potato.
- Change water every 3 to 5 days for best health
- Replace immediately if water is cloudy or smells bad
- Use fresh, pH-balanced water when refilling containers
- Clean container surfaces when changing water to remove slime
- Add diluted liquid fertilizer every 2 to 4 weeks if continuing growth
Maintaining fresh, clean water supports steady growth and helps you spot problems early. Over time, regularly switching water reduces stress and encourages new roots to form faster.
Lighting and Temperature Requirements for Water-Grown Potatoes
Potatoes grown in water need about 12 to 16 hours of light each day. Less than six hours slows their growth and energy production. Too much light, over 18 hours a day, harms plants.
It makes stems grow long and weak. This weak growth can hurt your potatoes. Pick a bright spot with indirect sunlight.
Or use a grow light with a timer. The timer keeps the light steady for your plants.
Keep the water and air temperature between 60 and 75 degrees Fahrenheit for the best results. These temperatures help the potato sprout quickly and grow strong roots and stems. When temperatures drop below 55 degrees, sprouting slows down.
Sprouting may even stop completely at colder temps. Keep your setup warmer to help growth. Temperatures above 80 degrees can weaken your potato plants.
Heat can also harm the water quality your plants depend on. Try to keep things cooler.
The temperature difference between day and night should be 10 to 15 degrees Fahrenheit. This range lets the plant rest and grow properly. Adjust your setup closer or farther from windows to control light.
Use a small heater if indoor temperatures drop too low. A fan can provide cooling if it gets too warm. Replace the water every few days to keep it clean.
Standing water can damage your plants’ growth. Clean water supports good plant health.
Common Problems and How to Fix Them When Growing Potatoes in Water
Root rot happens when potato roots sit too long in stagnant water. It turns roots brown and mushy, stopping nutrient uptake. To prevent it, change the water every 3 to 5 days and keep the container clean.
When root rot begins, cut off soft roots using clean scissors. Change the water to fresh, oxygen-rich water.
Add about 1 teaspoon hydrogen peroxide per gallon. This treatment kills rot-causing microbes before they spread further.
Algae growth creates a slimy green layer on water and pot surfaces. It blocks light and depletes oxygen the potatoes need.
Algae forms if the water container gets direct sunlight. It also appears if water stays too long without changing.
Control algae by moving your setup away from direct sunlight or covering the container. Changing water regularly and wiping algae off container sides also helps.
A few drops of bleach or hydrogen peroxide per gallon stop algae growth. These won’t harm your potatoes.
Leggy shoots develop when potato plants don’t get enough light. They stretch tall and thin, becoming weak.
Keep potatoes near a south-facing window or under a grow light. Provide at least 12 hours of light daily.
When light is lacking, trim the lanky shoots back to encourage bushier, stronger growth. Adjust the light source closer but not too close to avoid burning. This fixes legginess and stops energy waste in long thin stems.
| Problem | Cause | How to Fix | Frequency or Detail |
|---|---|---|---|
| Root Rot | Stagnant, unclean water | Change water every 3-5 days; trim affected roots | Hydrogen peroxide 1 tsp/gal to treat |
| Algae Growth | Light on water and slow water changes | Move container; cover container; regular water changes | Use bleach or peroxide drops in water |
| Leggy Shoots | Insufficient light | Provide 12+ hours of direct or grow light | Trim shoots back for bushiness |
| Poor Sprouting | Cold temperature or old stored potatoes | Store seed potatoes at 50, 60°F before planting | Check and remove rotten potatoes regularly |
Poor sprouting happens if potatoes or the water are too cold, usually below 50°F. Keep your potatoes at room temperature before starting and maintain water temperature between 60 and 70°F. Store seed potatoes in a dark, cool spot to avoid premature sprouting or rotting.
Check your potatoes each week for any rot or sprouting. Remove bad potatoes right away to stop spread to healthy ones. This keeps your potato batch strong and growing steady.
Change your potato water often and watch roots carefully to catch problems early.
When and How to Harvest or Transplant Water-Grown Potatoes
You can harvest potatoes growing only in water, but timing matters. Wait about three to four months after planting to check if they’re ready. Transplant plants when you see sturdy shoots and roots about one to two inches long.
Signs Potatoes Are Ready to Harvest
Look for shoots that appear thick and strong, not thin or weak. Roots should be well-developed, about one to two inches in length. These signs mean the potato tubers are forming and can be moved or harvested.
After three to four months in water, your potatoes usually reach maturity. Smaller tubers may need more time. Bigger ones show knobbly lumps beneath the roots.
Check the water clarity. Murky water can harm tubers, signaling a need to harvest or transplant soon.
Transplanting Potato Plants to Soil or Medium
Transplant after roots are about 1 to 2 inches long and shoots look thick and healthy. Use a container with 3 to 4 inches of slightly acidic, grainy potting soil. This soil helps roots adjust and grow well outside the water.
Handle the roots gently during transplanting to keep them intact. Broken roots hinder nutrient and water uptake, slowing growth. Placing plants in larger pots gives roots space to expand and helps produce more potatoes.
- Prepare a pot with 3 to 4 inches of acidic, grainy soil.
- Lift the potato plant gently from water, supporting roots carefully.
- Set the roots into the soil, keeping them straight and spread out.
- Cover roots gently with more soil but leave shoots exposed.
- Water the soil lightly, keeping it moist but not soaked.
- Place the pot in a warm area with indirect light for adjustment.
- Watch for new growth to confirm transplant success.
Harvesting and Storage Tips
To safely harvest potatoes from water, remove them without pulling hard on roots. Use tools like a hooping tool for bigger setups to avoid root damage. Gently work the potato loose to keep the plant healthy if you want more growth.
After you harvest, let potatoes dry properly to stop rot. Keep them somewhere cool, dark, and dry with good airflow. Don’t store them in freezing or hot areas, which can harm the potatoes fast.
Differences Between Hydroponic Systems and Simple Water Methods
Growing potatoes in water varies a lot between hydroponic setups and simple water jar methods. Hydroponics uses advanced gear and nutrient solutions, speeding up growth and saving water. The water jar method is easy and cheap but slower and less efficient for growing tubers.
Hydroponic systems need pumps, nutrient mixes, and grow lights to provide oxygen and nourishment. This setup uses about 90% less water than soil farming because it recycles water carefully.
The simple water jar just needs a clear container and a potato with eyes. It works by letting roots dangle in water but doesn’t supply nutrients or enough oxygen.
| Feature | Hydroponic System | Simple Water Jar Method |
|---|---|---|
| Equipment | Pump, nutrient solution, grow lights, container | Glass or jar, potato with eyes |
| Water Use | Uses 90% less water than traditional farming | Uses more water, often changed regularly |
| Oxygenation | Good oxygen supply through aeration and pumps | Poor oxygen supply, just roots submerged |
| Growth Speed | Faster growth due to nutrients and control | Slower growth, no added nutrients |
| Challenges | Requires setup and knowledge of nutrients | Simple to start but limited to sprouting only |
| Cost | Higher startup cost ($50+) for gear | Very low cost, under $10 |
You’ll notice hydroponics needs more work upfront to build the system. You mix nutrient solutions and manage pumps and lights. This effort results in healthier plants and faster growth.
The water jar method uses just a potato and a container. It is perfect for beginners or kids who want to try growing potatoes. This simple setup needs very little space or equipment.
The simple method mainly shows sprouting and root growth. It rarely leads to harvesting new potatoes because nutrients are missing.
Hydroponics boosts growth by supplying everything plants need continuously. Choose hydroponics when you want real tubers faster and plan to invest time and money.
Tips for Success and Safety When Growing Potatoes in Water
Use distilled water or leave tap water out 24 hours first. This removes chlorine, which can damage potato roots. Stay away from chemically treated water as it stresses plants and slows growth.
Keep the water container clean to stop bacteria and mold buildup. Rinse it weekly with hot water and mild soap. Change the water every 2 to 3 days to keep it fresh and oxygen-rich.
Wash your hands before handling potatoes or water to avoid spreading germs. Use clean tools when adjusting potatoes in the water. Bruised or damaged potatoes spoil faster and invite disease.
- Use filtered, distilled, or rainwater instead of untreated tap water
- Clean containers weekly with mild soap and hot water
- Change water every 2 to 3 days to prevent stagnation
- Wash hands and tools before touching potatoes or water
- Handle potatoes gently to avoid bruising
- Keep the growth area dry and free from pests
Keep an eye out for any white slimy coating or odd smells. These signs mean bacteria are growing in the water. Replace the water immediately, then clean the container well before refilling.
Temperature matters. Keep potatoes in water between 60°F and 70°F. Too warm.
Bacteria risk grows; too cold, and potato growth slows. Use a spot indoors with indirect sunlight and steady temperature.
Never reuse water without cleaning the container because it may carry diseases to your potatoes.
Step-by-Step Action Plan
Follow these clear steps for growing potatoes in water. Each phase has a simple check to see if you’re on track.
- Before you start: Pick firm potatoes with visible eyes. Soak them in water for 24 hours to jumpstart sprouting.
- Day 1: Place sprouted potatoes in a container filled with clean water. Roots should start forming within a few days.
- Week 1: Keep water clear and change it every two days. Watch for roots growing and shoots appearing.
- Week 2: Move the container to a bright spot with indirect sunlight. Leaves should begin to grow slowly.
- Weeks 3-4: Maintain consistent water levels and temperature around 65-75°F. Root systems will expand noticeably.
- After 4 weeks: Look for small tubers forming near the base of the stems. These will grow into potatoes.
- Week 6 or when tubers are 1-2 inches: Decide if you want to harvest them now. You can also transplant tubers into soil or hydroponic systems. Tubers should be firm and sized well.
Frequently Asked Questions
Can I Use Any Type of Potato to Grow in Water?
Not all potatoes work well for water growth. Avoid those treated with chemicals against sprouting. Choose organic or untreated potatoes for better success.
Do I Need to Change the Water Regularly When Growing Potatoes in Water?
Yes, changing water every few days prevents stagnation and root rot. Fresh water keeps oxygen levels high for healthy root growth.
How Do I Prevent Potatoes from Rotting While Growing in Water?
Keep an air gap between the tuber and water surface to avoid rot. Also, use clean water and avoid overfilling the container.
What Type of Container Is Best for Growing Potatoes in Water?
Use a clear container or glass jar to monitor root growth easily. Ensure it can hold water without leaks and supports the potato well.
Can I Grow Multiple Potatoes in the Same Water Container?
It’s not recommended as crowding limits oxygen and nutrient access. Use separate setups for each potato to give them enough space.
Is It Necessary to Add Nutrients to Water for Potato Growth?
Yes, plain water lacks essential nutrients for tuber growth. Add a balanced fertilizer designed for hydroponics for better results.
Key Points to Remember
Growing potatoes in water takes some patience but is quite rewarding. Start now by setting up your sprouted potatoes in a clean container. Watch them grow and enjoy fresh potatoes soon.