How to Propagate Mini Monstera: A Complete Guide for Fast, Healthy Growth
Propagate Mini Monstera by taking stem cuttings with at least one node. Root cuttings in water or directly in soil to start new plants quickly.
Use clean, sharp scissors or a knife to avoid infection. Always cut just below the node where roots grow best.
The best temperature for rooting is between 70°F and 80°F. Warm and humid conditions help cuttings develop strong roots faster. Placing cuttings inside a small plastic bag keeps humidity high. Avoid direct sunlight to prevent leaf damage or drying out.
Keep cuttings in bright, indirect light to prevent leaf burn. Change water every few days if you root in water.
Look for roots growing 2 to 4 inches long before planting. Plant cuttings in well-draining soil with a light potting mix.
Key Takeaways
- Use a sharp, clean tool to cut below a Mini Monstera node.
- Root cuttings in water or soil at 70°F to 80°F for best results.
- Keep high humidity around cuttings to speed up root development.
- Place cuttings in bright, indirect light daily to protect leaves.
- Change water regularly when rooting cuttings in water to avoid rot.
- Wait for roots to reach about 3 inches before transplanting into soil.
How to Propagate Mini Monstera Step-by-Step

Start with selecting a healthy stem from your Mini Monstera plant. Pick a branch with a clear leaf node. The node looks like a small bump or joint.
This node is where new roots will grow. So it must be included in your cutting.
Use clean, sharp scissors or pruning shears for your cut. Clean tools reduce the risk of infection or damage. Cut a piece about 4 to 6 inches long.
Make sure it has at least one leaf. Too small a cutting might not root well. Too big could stress your plant.
Gather your materials before starting. Get a clean cutting tool and a small container. Use filtered water if rooting in water.
Rooting hormone is optional but can help. Prepare loose, well-draining potting soil before rooting in soil.
- Select a healthy stem at least 4 inches long with one visible leaf node.
- Cut just below the leaf node using clean, sharp scissors or pruning shears.
- Remove any lower leaves near the base to prevent them from rotting.
- Put the cutting in a jar with filtered water covering the node.
- Dip the cut end in rooting hormone before planting in soil.
- Plant the cutting gently into moist, well-draining soil if not using water.
- Keep the cutting in warm, indirect light and maintain humidity for best results.
Taking cuttings with a leaf node ensures roots can develop effectively. Removing lower leaves prevents rot and water contamination. Using filtered water reduces chlorine, which can harm young roots.
The cutting should stay hydrated but not submerged as that can cause stem rot. Rooting in soil skips the waiting time in water and can lead to stronger early growth. However, water propagation lets you watch root progress and spot problems early.
After following these steps, expect roots to develop within 1 to 3 months. Watch for new leaves as a sign of successful propagation. Avoid cutting from unhealthy, yellowing, or weak stems as they rarely grow well.
Differences Between Water and Soil Propagation Methods
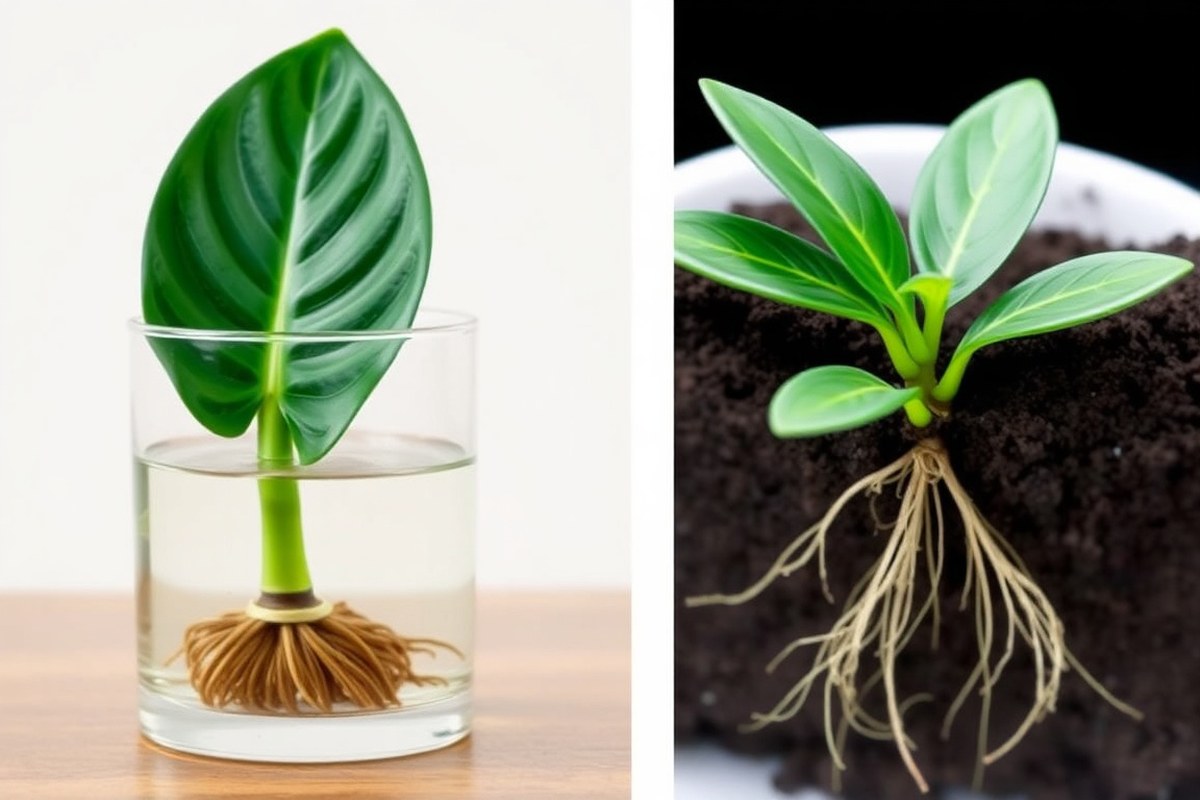
Water and soil propagation are the main ways to grow Mini Monstera. You start with cuttings. Both methods help new roots form well.
Water propagation lets you watch roots grow clearly in the jar. Soil propagation skips water and goes straight into potting soil.
This is like the soil you use for your other plants. It saves one step.
Water propagation is very beginner-friendly and shows root progress easily. But moving the rooted cutting from water to soil can cause transplant shock. Soil propagation avoids shock to the plant.
It needs careful watering. Good drainage is a must to prevent rot and stress.
| Feature | Soil Propagation | Water Propagation |
|---|---|---|
| Description | Plant cutting directly in well-draining soil | Place cutting in water until roots develop |
| Pros | No transplant shock; mimics natural growth | Easy to monitor roots; beginner-friendly |
| Cons | Requires careful moisture control; less root visibility | Transition to soil can cause shock; extra step |
| Best timing | Spring and summer, during active growth | Spring and summer, during active growth |
| Care tips | Water when top 1-2 inches of soil dry | Change water every few days to avoid stagnation |
| Root length before transplant | N/A (roots form in soil) | 3-4 inches of roots recommended before potting |
Water propagation is usually the first choice for Mini Monstera beginners. It requires a clear container and clean, room-temperature water.
Watch for roots 3 to 4 inches long before moving the cutting to soil. Once transplanted, water the soil to settle it around the roots.
Keep fresh water in your jar and change it every few days to prevent bacterial growth.
Soil propagation suits those who want to skip transplanting and mimic natural rooting. Use a lightweight, well-draining potting mix.
Water just enough so the soil stays moist but not soggy, which can rot the cutting. Check the soil moisture regularly, only watering when the top inch or two feels dry.
Choosing between these methods depends on your patience and setup. Water propagation takes a bit longer but shows progress clearly. Soil propagation works well to avoid transplant shock.
You need the right soil. Also, water control is very important. Both can produce healthy Mini Monstera plants when cared for properly during spring or summer.
How to Care for Mini Monstera Cuttings During Rooting
To help Mini Monstera cuttings root, give them bright, indirect light. Keep the room warm and the air humid for best results. These conditions help cuttings grow roots faster.
Keep water fresh if using water propagation. Watch for roots in 4 to 6 weeks. Proper care helps the cuttings survive and grow strong roots faster.
Ideal Lighting Conditions
Mini Monstera cuttings need bright, indirect light during propagation. Direct sunlight can burn the leaves and slow root growth. Low light delays rooting and weakens new growth.
A good spot is near a north or east-facing window with filtered light. Avoid south-facing windows that get harsh, direct rays. You can also use a grow light on a low setting to supplement natural light.
Maintaining Temperature and Humidity
Keep cuttings in a warm spot between 65 and 85°F (18 to 29°C). Cooler temperatures slow rooting, while heat above 85°F may stress the plant. Stable temperature helps new roots form faster.
High humidity supports root growth and prevents leaves from drying out. Place a humidity tray under the cutting or use a clear plastic bag. Make sure the bag doesn’t touch the leaves.
This keeps the air moist and helps roots form. Aim for 60% or higher humidity.
Here are key environmental tips to support your Mini Monstera cutting:
- Keep air temperature steady between 65, 85°F (18, 29°C)
- Avoid cold drafts and sudden temperature changes
- Maintain humidity levels above 60%
- Use a humidity tray or plastic tent to boost moisture
- Avoid direct sun on the cutting’s leaves or water
Water Changing and Moisture Management
Change water every 3 to 5 days to keep it fresh and oxygen-rich. Stale water encourages bacteria growth that can rot the cutting. Regular water changes help roots grow faster and healthier.
For soil or sphagnum moss propagation, keep the medium damp but not soggy. Too much water causes root rot, and too little slows root development. Check moisture daily and water lightly when the top feels dry.
Root growth usually appears within 4 to 6 weeks, depending on conditions. Check light, temperature, and humidity if roots are slow to form. Adjust these factors to boost root growth.
Consistent care improves your cutting’s chances. Yellowing leaves or mushy stems often signal too much water or poor air circulation.
Recognizing Healthy Root Development and When to Transplant
Mini Monstera cuttings usually start rooting in about 4 to 5 weeks. Keep an eye on the root tips.
They need to reach around 2 inches long before you move the cutting. Measuring the root length regularly helps you know if the cutting is ready for soil.
Healthy roots look firm, white or light tan, and spread evenly from the stem. Avoid roots that are mushy, brown, or have a bad smell. These signs mean root rot or failure.
Always pick healthy roots for propagation. The leaves should stay firm and green.
Wilted or yellow leaves show the cutting might not be healthy. Healthy leaves mean your cutting is growing well.
Roots that are 2 inches or longer mean transplant time. Use a pot with good drainage to keep soil healthy. New leaves or roots that don’t move easily also show readiness for potting.
Air Layering Method for Propagating Mini Monstera
Air layering helps you grow a new Mini Monstera from a stem. You don’t cut the stem off first. This way keeps the plant attached while growing roots.
You wrap moist sphagnum moss around a node with an aerial root. This helps roots start to grow on the stem. The stem stays attached to the mother plant.
This method reduces the chance of leaf loss or root rot. It is a safe way to keep the parent plant healthy. Rooting happens while still attached to the plant.
Necessary Materials and Preparation
You need a few simple things for air layering your Mini Monstera. Gather fresh sphagnum moss, plastic wrap, string or twist ties, and a sharp knife. These tools prepare you for the air layering process.
Have everything ready before you start. A node with a small aerial root nearby is essential for the process to work.
Before you start, soak the sphagnum moss in water until it’s damp but not dripping. Find a strong stem with a node and an aerial root. The root should be about pencil size or smaller.
This spot is the best for rooting. This node is where new roots will sprout. So it has to be healthy and firm.
Wrapping and Securing the Node
First, make a small cut on the stem just below the node. This cut should be shallow but visible enough to encourage root growth. Then gently pull back the aerial root if needed to expose the node fully.
Pack the damp sphagnum moss around the node and aerial root. Wrap everything tightly with plastic wrap to hold in moisture. Use string or twist ties to hold the plastic wrap tightly.
Make sure no air can get to the moss. This keeps the moss moist for root growth.
Monitoring and Root Harvesting
Check the moss every few days to make sure it stays damp. You can mist it lightly if it starts drying out.
Roots usually start showing in 4 to 6 weeks. But it might take longer depending on your home’s temperature and humidity.
Cut below the new root ball when roots fill the moss well. This separates the new plant from the mother plant. The Mini Monstera is ready for potting.
Plant your Mini Monstera in soil right away and water it lightly. Keep the soil moist but not soggy to help the roots get established.
- Pick a stem with a healthy node and aerial root.
- Soak sphagnum moss until damp but not dripping.
- Make a shallow cut below the node on the stem.
- Wrap the node and root with damp moss.
- Cover moss tightly with plastic wrap and secure it.
- Keep the moss moist by checking it every few days.
- Wait 4 to 6 weeks for roots to grow.
- Cut below the new root ball and pot it in soil.
Tip: Avoid letting the moss dry out; dry moss stops root development fast.
Common Propagation Mistakes and How to Fix Them
One common mistake is letting cuttings sit in stagnant water for too long. This causes fungal or bacterial rot, which kills roots before they develop. Change the water every 3 to 4 days to keep it fresh and oxygenated.
Another issue is using pots without drainage holes for soil propagation. Water can pool and drown roots, leading to root rot. Always pick pots with drainage holes to let water out.
This keeps the soil moist but not soaked. It helps prevent root rot in your Mini Monstera.
Wilting leaves usually mean too much water or poor air flow. Fungi thrives in wet, still places. Water only when the soil’s top inch is dry, and ensure good air movement.
- Change water every 3, 4 days during water propagation
- Use pots with drainage holes when rooting in soil
- Allow soil surface to dry slightly before watering
- Keep cuttings in indirect light, not direct sun
- Maintain room temperature between 65°F and 75°F
- Remove any leaves that start to wilt or rot
Don’t plant cuttings right after cutting them. Let the cut ends dry a bit first. This helps stop rotting before they go in water or soil.
Let the cuttings dry out for a few hours. This simple step lowers the chance of rot and encourages root growth.
Sometimes, roots develop fine but the cutting stalls afterwards. This happens if humidity is too low or temperature is incorrect. Place a plastic bag loosely over soil cuttings for humidity.
You can also mist them regularly to keep air moist. Both methods help prevent drying out during rooting.
Using Rooting Hormones and Callusing Techniques
Rooting hormones are not always necessary for Mini Monstera cuttings. But they can boost your success rate. When your cutting has fewer leaves and healthy nodes, use rooting hormone.
Dip the stem end in powder or gel to help roots grow. This boosts your cutting’s chance to take root. This encourages faster root growth and protects against rot while cutting starts to develop roots.
Before using rooting hormone, make sure to select a healthy stem with at least one node. Trim the cutting with clean scissors or a sharp knife right below a node. Pat the cut end dry with a paper towel to remove excess moisture.
Gently dip the stem’s end into the rooting hormone. Cover about half an inch of the stem with the powder or gel. Be careful not to use too much.
Callusing your cutting is important to reduce rot risk before placing it into soil or water. After cutting the Mini Monstera stem, place it on a dry surface. Keep it away from direct sunlight to avoid damage.
Let it rest there for a bit. Let it rest for 1 to 2 days at room temperature, around 65 to 75°F. Let the cut end dry and form a callus before planting.
The callus protects against bacteria and stops stem infections. This step helps keep your cutting healthy.
Callusing your cutting is simple but effective. Make sure the sliced end is dry and brownish, not wet or green. Once the callus has formed, plant the cutting into your chosen medium.
Avoid watering the soil immediately after planting because excessive moisture can cause rot. Mist lightly instead, helping roots grow without soggy conditions.
Skipping the callusing step raises the risk your cutting will rot early. Without the protective layer, bacteria can infect the stem. Take time to let it dry first.
High humidity needs longer callusing time to protect your cutting. This prevents the stem from staying wet too long. Wet stems are prone to rot and decay.
For cuttings with many leaves, rooting hormones provide extra root stimulation, making the process faster. Hormone powders cost about 5 to 10 dollars each.
They last through many propagation attempts. This small cost improves your chances of success.
Adjusting Propagation Techniques for Seasonal and Environmental Factors
Propagating Mini Monstera works best during active growth times. Adjust care based on your home’s light, temperature, and humidity. This helps the plant grow stronger roots.
Knowing when and how to change these elements helps you avoid slow rooting or weak cuttings. Seasonal shifts and room conditions can make a big difference in success.
Best Seasons for Propagation
Early spring is the prime time to propagate your Mini Monstera. That’s when the plant wakes from dormancy and sends energy into new roots and leaves. Propagating then usually takes 2 to 4 weeks to root under good conditions.
Avoid propagation in late fall and winter. Low light and cooler temperatures slow down growth and root development. Your cuttings may not survive or will take much longer to grow roots.
Start propagation as day length grows and temperatures stay above 65°F. This timing boosts the chance of success. It matches the plant’s natural cycle. This gives your cuttings the warmth and light they need for faster growth.
Managing Light in Different Climates
Mini Monstera needs 10 to 12 hours of bright, indirect light daily for healthy rooting. Without enough light, your cuttings look pale, grow slowly, or get leggy with long stems.
Use a grow light when sunlight is weak or your home is shady. It supplements the natural light your Mini Monstera needs. This helps roots develop quicker.
Set it to cover your new cuttings for about 12 hours a day. Keep the light 12 to 18 inches away to avoid burning leaves.
In sunnier climates or rooms, place cuttings near a window with filtered light. Avoid direct sun, which can stress or scorch the cuttings during rooting.
Humidity and Temperature Adjustments
Mini Monstera roots best in temperatures between 70°F and 85°F. Cooler rooms under 65°F slow growth and might cause failure. Aim for warm, stable air during rooting.
Humidity around 60 to 80% helps keep leaves hydrated and speeds root growth. Low humidity dries leaves and stems, making cuttings shrivel or rot. Use a humidity tray, mist your cuttings, or cover them with a clear plastic bag.
Here’s a simple care calendar to adjust your propagation setup by season:
- Spring: Place near bright window, keep humidity high, room 70-85°F
- Summer: Avoid mid-day sun, allow airflow, mist cuttings daily
- Fall: Increase humidity with trays or covers, maintain warmth
- Winter: Use grow lights 12 hours daily, keep temperature above 65°F
Don’t leave cuttings in direct sun or cold drafts; both hurt root development.
Step-by-Step Action Plan for Propagating Your Mini Monstera
Follow these clear steps to start growing new Mini Monstera plants today. Watch for signs that show your cuttings are rooting successfully.
- Before you start: Pick a healthy stem with a leaf and one node. Roots will grow from the node area on the stem. Choose a cutting with a good node and a fresh leaf.
- Day 1: Cut the stem cleanly just below the node. Use sharp scissors or pruning shears to avoid crushing the plant.
- Day 2: Let the cutting dry for a few hours to callous. This helps prevent rot when it goes into water or soil.
- Week 1: Place the cutting in water or moist soil. Keep it in indirect light and maintain warm temperatures around 70°F.
- Week 2: Check for root growth about 1 to 2 inches long. Roots mean it’s time to keep caring for your cutting. Without roots yet, be patient or try a new cutting.
- After 3 to 4 weeks: Check if your cutting has roots in water. If it does, you can now plant it in soil. For soil propagation, ensure new leaves develop before transplanting.
- Ongoing: Water moderately and avoid direct sun. Watch leaves for yellowing or drooping, which could mean overwatering or low light.
Frequently Asked Questions
What Size Cutting Is Best for Propagating a Mini Monstera?
Choose a stem cutting around 4 to 6 inches long with at least one node. This size helps roots grow strong. It also supports a healthy plant.
Can Mini Monstera Be Propagated from Leaf Cuttings Alone?
No, leaf cuttings alone won’t grow roots or new plants. You need a node on the stem because roots grow from nodes, not just the leaf.
What Type of Water Should I Use for Rooting Mini Monstera Cuttings?
Use room temperature, filtered or distilled water for rooting cuttings. Tap water with chlorine can slow root development or harm the cutting.
How Long Does It Typically Take for Mini Monstera Cuttings to Root?
Roots usually appear within 2 to 4 weeks under good conditions. Warmer temperatures and humidity help speed up root growth.
Can Mini Monstera Be Propagated in Low Light Conditions?
Low light slows down rooting and growth significantly. Place cuttings in bright, indirect light for best results.
Should I Remove Lower Leaves from the Cutting Before Rooting?
Yes, removing leaves near the node prevents rot and conserves the cutting’s energy. Keep at least one leaf on top to support photosynthesis.
Wrapping Up
Propagating Mini Monstera takes patience and good care at each step. The best thing is to start one cutting today and track its progress. This hands-on growth makes adding new plants easier and more satisfying over time.