How Do You Know When Pot Is Ready to Harvest: 8 Key Signs and Steps
Watch the pistils and trichomes closely to know when pot is ready. When 70 to 90 percent of the pistils darken and curl, the buds are maturing. Most trichomes turn cloudy white, signaling harvest time.
Start with the pistils, the tiny hairs on buds. They change from white to orange or brown and curl in as the plant ages. This shows the plant is nearly ready.
Look closely at the trichomes, the tiny crystals on buds. Their color shift helps you find the best harvest moment. Checking these carefully is key.
Timing changes by strain and desired effects. Autoflowers need watching after eight weeks, others around ten weeks. Stay alert to pick the best time for quality buds.
Key Takeaways
- Check pistils for color change: aim for 70-90% darkened and curled.
- Use a magnifier to inspect trichomes for mostly cloudy with some amber.
- Harvest when trichomes are milky and pistils are mostly darkened for balance.
- Early harvest with mostly cloudy trichomes gives a more energetic high.
- Later harvest with more amber trichomes delivers stronger, sedative effects.
- Autoflowers usually finish between 8 and 12 weeks from sprouting.
1. When Is Cannabis Ready to Harvest? Key Indicators
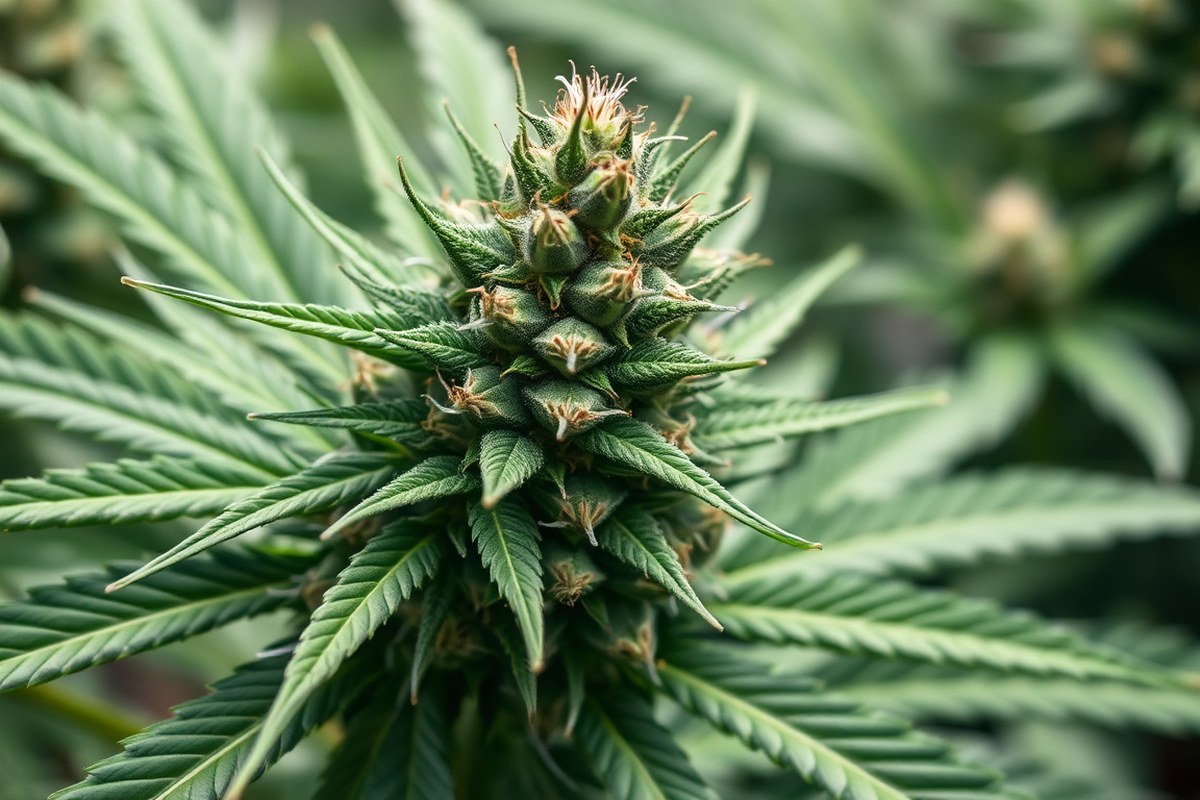
You can tell cannabis is ready to harvest by closely checking a few key visual signs. The pistils, those tiny hair-like structures on buds, darken and curl in as the plant matures. Harvest time is near when 70 to 90 percent of pistils darken.
They turn brown or orange and curl inward. This change shows the buds are maturing well.
Trichomes are another important clue. These tiny, crystal-like glands cover the buds and leaves. Trichomes shift color as the plant ripens.
They start clear, then go milky or cloudy. Finally, they turn amber in color. Harvest when most trichomes are milky.
This gives the highest THC level. It also results in a more uplifting high. Waiting until some trichomes turn amber breaks down THC.
This causes a heavier, more sedative effect. Plan this if you want a couch-lock feeling.
You’ll also notice color changes in the fan leaves near harvest time. Leaves usually start yellowing near harvest time. This shows the plant slows nutrient use.
It focuses energy on growing buds instead. Firm buds with these yellowing leaves mean the plant is nearing harvest.
Pistil color, trichome look, and leaf changes together help you decide. This checklist tells you the best time to cut buds.
2. How to Inspect Trichomes for Harvest Timing

To know when your pot is ready to harvest, inspect the trichomes closely. Use a magnifier to see their color changes from clear to cloudy to amber. This shows the exact maturity of your cannabis buds.
It helps you pick the right harvest moment. That way, you get the effects you want.
Choosing the Right Magnifier or Microscope
You need a tool that offers at least 30x magnification to clearly see trichomes on buds. A jeweler’s loupe or a small digital microscope works well and usually costs $10 to $40. Avoid basic magnifying glasses as they won’t give the needed detail on trichome color changes.
Look for a bright built-in light on the magnifier to illuminate the trichomes well. This helps you see clear, cloudy, or amber colors without straining your eyes. Ensure the magnifier fits comfortably in hand for steady viewing during checks.
Selecting and Positioning Buds to Inspect
Pick several buds from different parts of the plant, not just the top colas. Check about 5 to 10 buds to get a good overall picture of maturity. Some lower buds may mature slower, so sampling multiple spots prevents missing uneven development.
Hold the bud steady and position the magnifier about an inch away. Focus on trichomes on sugar leaves and small calyxes, not just big leaves. This way you’ll spot clear, cloudy, and amber trichomes which determine harvest timing best.
- Clean the magnifier lens to avoid blurry views.
- Choose 5, 10 buds spread around the plant.
- Bring the magnifier close and adjust focus carefully.
- Observe trichomes on sugar leaves and bud surfaces.
- Note what percentage are clear, cloudy, and amber.
- Repeat every 2, 3 days as harvest time nears.
Recording and Monitoring Trichome Changes
Take notes or photos each time you inspect trichomes. This tracks progress and prevents missing the ideal harvest window. Try to get about 70 to 90% cloudy trichomes.
Also aim for 10 to 30% amber trichomes. This balance helps maximize potency and the effects you want.
Clear trichomes mean the plant isn’t ready; wait longer if most are still clear. Mostly cloudy trichomes produce a more uplifting high.
More amber trichomes lead to relaxing or couch-lock effects. Harvest timing depends on what kind of high you want.
Avoid harvesting too early with mostly clear trichomes; buds won’t be potent yet.
3. Pistil Color Changes and What They Mean
The pistils on your cannabis buds start out white and straight. As the plant matures, they turn orange, red, or brown and begin curling inward. This change signals that the plant is moving closer to harvest time.
Usually, 70 to 90 percent of pistils dark and curl in. This signals a good time to think about harvesting. At this point, the plant usually offers a balanced THC effect.
Less than 70 percent means it may need more time. Over 90 percent could mean the plant is past peak potency.
Pistil color alone may mislead you. Some pistils darken unevenly or too soon.
Environmental stress or genetics can also affect how pistils change. So, use pistil color as one clue, not the whole story.
Combining pistil observations with trichome inspections gives a clearer picture. Trichomes are tiny crystals on buds that change from clear to cloudy or amber.
First, check if about 80% of pistils are dark and curled. Then use a magnifier to examine the trichomes closely.
Start watching pistils about two weeks before you expect to harvest. This helps you better time the harvest. When you see 70 to 90 percent of pistils dark and curled, examine trichomes daily.
Most trichomes look milky white, some amber too. Harvest soon for balanced effects.
Watching pistils takes little time but requires patience and good lighting. It costs nothing but a small magnifier can help spot detailed changes.
Don’t harvest too early when pistils are mostly white. Avoid harvesting too late when they’re all dark and brittle.
4. Differences in Harvest Timing by Strain Type
Indica strains usually mature faster than sativas, ready in about 6 to 8 weeks of flowering. Sativa plants need more time, often 8 to 12 weeks to finish flowering. Autoflower strains follow a set schedule.
They usually finish in 8 to 12 weeks from seed. Light changes don’t affect their finish time.
Signs of maturity vary with strain. Indicas tend to show dense buds and dark, swollen trichomes earlier. Sativas flower for a longer time.
They make lighter, fluffier buds. These buds take longer to thicken and change color. Autoflowers often signal harvest time by pistil color change but keep on a strict clock.
| Feature | Indica | Sativa | Autoflower |
|---|---|---|---|
| Flowering Duration | 6-8 weeks | 8-12 weeks | 8-12 weeks from seed |
| Maturity Signs | Dense buds, early trichome cloudiness | Fluffier buds, slower trichome development | Pistil color change on schedule |
| Optimal Harvest Window | 1-2 weeks after initial maturity | 1-2 weeks after visible ripening | Fixed window 70-90 days post-germination |
| Harvest Timing Adjustment | Harvest earlier for a stronger body effect | Wait longer for psychoactive peak | Stick to timer; less flexibility |
Adjust your harvest time based on strain type and desired effects. Indicas let you harvest a little early for a more sedative feel. Sativas benefit from longer flowering for full psychoactive impact.
Autoflowers give less wiggle room. So plan to harvest between 70 and 90 days after sprouting.
Autoflower strains are easier for beginners because they don’t rely on light cycles. However, they can be less forgiving if you miss their short harvest window. Watch pistils carefully during flowering.
Use a timer to track time. Autoflowers don’t pause or slow because of light changes.
5. Effects of Early or Late Harvesting on Pot Quality
Harvesting too early usually means your buds have lower THC levels. Trichomes will be mostly clear, and you’ll miss that peak potency. The high tends to feel more racy or anxious, with less body and lasting effect.
Early harvesting also harms yield and flavor. Buds look less dense, and aroma may be weak or grassy. The taste will often lack the full complexity of mature cannabis because terpenes are still developing.
Waiting too long causes other problems. When trichomes turn mostly amber, THC starts to break down, reducing strength.
The high shifts toward a more sedative or couch-lock effect, which isn’t what everyone wants. Overripe buds also lose some aroma and flavor as delicate terpenes degrade.
How you time your harvest shapes your final product. Aim for about 85% milky trichomes for good potency. About 15% amber trichomes help improve flavor.
This mix balances strength and taste well. This stage maximizes THC while keeping rich, fresh terpene profiles for aroma.
Different strains react differently to timing. For example, sativas harvested slightly earlier keep their energetic buzz.
Indicas benefit from a bit more amber trichome development to improve their relaxing effects. Knowing your strain’s typical window helps plan your harvest.
Flavour changes with timing because terpenes evolve late in flowering. Early buds can taste green or grassy.
Late harvests tend to lose sharpness, sometimes becoming dull or musty. The flavor you want depends on how you expect to use the cannabis.
Waiting until most trichomes are milky white ensures peak THC. Too early or late catches you with weaker, less flavorful buds.
6. How and Why to Flush Cannabis Before Harvest
Flushing means giving your cannabis plants plain water before harvest. Start flushing about 1 to 2 weeks before harvest to clear out leftover nutrients.
This process removes extra salts and chemicals from the plant. It helps improve the taste and smoothness of the final product.
Timing and Duration of Flushing
Begin flushing roughly 7 to 14 days before your planned harvest date. This period depends on your strain and feeding schedule.
Some growers prefer a full two weeks. Others find one week enough for smaller plants.
Watch your plants during this time. Flushing too early can reduce yields.
Too late might leave residual nutrients affecting taste. Use a longer flush when feeding your plants heavily.
Water Quality and PH Guidelines
Use plain, clean water with a pH between 6.0 and 6.8. This pH range matches the best balance for cannabis nutrient uptake.
Avoid using tap water with high chlorine or fluoride. Filtered or distilled water works better.
Water temperature should be room temperature, around 65 to 75°F (18 to 24°C). Cold water shocks the plant and can slow flushing. Warm water helps the roots process the excess salts easier.
Flushing Maintenance Tips
Never add nutrients during flushing. Feed your plants only water for this period. Keep humidity and temperature controlled, as stress can affect plant health before harvest.
After flushing, try the “3-day darkness” technique. Keep plants in complete darkness for the last 72 hours.
Growers say this can improve resin production and final potency. However, it’s optional and depends on your confidence and strain.
You can skip flushing if you want. But it risks harsher smoke and a chemical taste. Many growers find the extra effort worth it for a smoother, cleaner bud.
Follow these steps for a successful flush:
- Stop feeding nutrients 1 to 2 weeks before harvest.
- Water your plants with plain, pH-balanced water only.
- Use enough water to saturate the soil but avoid overwatering.
- Keep water temperature between 65 and 75°F (18-24°C).
- Maintain stable temperature and humidity in your grow area.
- Optionally, keep plants in total darkness for the last 72 hours.
- Inspect plants daily for signs of stress or nutrient deficiency.
- Proceed with harvesting once flushing is complete and plants look healthy.
7. Step-by-Step Cannabis Harvesting Process
Harvesting cannabis involves clear steps to protect buds and keep their quality. You need the right tools and careful handling, plus a good drying setup. Follow these steps to get your cannabis from plant to proper drying without damage or stress.
Preparing Your Harvesting Area and Tools
Choose a clean, well-lit space for harvesting. It should be quiet and free of dust to avoid contaminating your buds. Having everything ready stops mistakes and keeps buds fresh.
Gather sharp scissors or pruning shears, gloves, small containers for trimmed leaves, and clean cloths. Use isopropyl alcohol to wipe tools and avoid mold spores. Prepare a drying rack or hangers nearby to move branches quickly.
Cutting Techniques for Plants and Branches
Cut branches carefully to keep buds intact. Use sharp scissors for clean cuts and avoid crushing stems. Cut near the base of branches but leave enough stem for hanging and handling.
Don’t rush the process; cut slowly to keep resin intact. Support the branch with one hand and cut with the other. For smaller autoflower plants, you can cut the whole plant at once to save time.
Initial Trimming and Handling After Cutting
Handle buds gently after cutting to keep trichomes from breaking. Avoid squeezing or dropping them on hard surfaces. Immediately remove large fan leaves but save sugar leaves for later trimming.
Place trimmed branches on a clean surface or hang them upright for drying. Keep buds out of direct sunlight to prevent THC loss. Use gloves to stop oils from your skin affecting the flower.
Setting Up for Drying Immediately
Move cut branches to your drying area right away. The space should be dark with temperatures around 60 to 70°F and humidity near 50%. This slows moisture loss and prevents mold growing on buds.
Hang branches upside down, spaced to allow air flow around each one. If space is tight, use drying racks but keep them clean and dust-free. Use fans on low settings to circulate air without blowing directly on buds.
- Clear and clean a workspace with good lighting and ventilation.
- Sanitize scissors, gloves, and trimming tools with isopropyl alcohol.
- Cut branches carefully at the base, leaving stems for hanging.
- Support branches to avoid bruising the buds while cutting.
- Remove large fan leaves immediately but keep sugar leaves for trimming.
- Handle buds gently; avoid dropping or squeezing them.
- Place branches in a dark, cool, humid spot to dry.
- Hang branches spaced out for air flow, using fans set low.
8. Proper Drying and Curing for Best Pot Quality
After harvesting, you should dry cannabis buds for about 7 to 10 days. Keep the temperature between 60°F and 70°F and the humidity around 45% to 55%. These conditions help slow the drying to preserve aroma and potency.
Hang your buds upside down in a dark, ventilated room. Proper airflow stops mold but avoids a strong breeze that can dry them too fast. You’ll know drying is done when stems snap instead of bending.
Next, curing starts by placing dry buds loosely into airtight jars. Open the jars once daily for 10 to 15 minutes. This happens during the first two weeks.
This helps “burp” the jars. This releases moisture and allows fresh air in, preventing mold.
After two weeks, reduce jar openings to every few days for another 2 to 4 weeks. Proper curing can take up to 6 weeks to unlock full flavors and smoothness. Check buds for firmness; they should feel slightly springy, not wet or crumbly.
Watch for mold risks by keeping humidity in jars at 60% to 65%. Too much moisture causes white fuzz; too dry makes buds harsh. A small hygrometer inside the jar helps you track these levels easily.
Signs of well-cured cannabis include a sweet, rich smell and a smooth smoke. Buds retain a bit of their moisture and don’t crumble in your hand. Avoid over-drying or you lose potency and taste.
Keep your drying space dark and ventilated. But don’t let buds get dry too fast or they’ll lose flavor.
Step-by-Step Action Plan for Harvesting Your Cannabis
Follow this plan to catch your cannabis at the best time for potency and effect. Each step helps you track growth and readiness clearly.
- 2 weeks before expected harvest: Start flushing your plants with plain water. This helps clear nutrients and improves taste.
- 3 days before harvest: Inspect the trichomes using a magnifier. Look for mostly cloudy trichomes with some amber ones for balanced potency.
- Day of harvest: Check pistils’ color. Aim for about 70-90% browned or curled pistils to confirm maturity.
- Harvest time: Cut the plants at the base and hang branches in a dark, ventilated room. The room should be around 60-70°F with 50% humidity.
- 3 to 7 days after hanging: Test bud stiffness and dryness. They should feel dry outside but still sticky.
- After drying (7, 14 days): Place buds in airtight jars for curing. Open jars daily for 15 minutes to release moisture and check for mold.
- Continue curing: Cure buds for at least 2 weeks for smooth flavor and better potency. Longer cures can further improve quality.
Frequently Asked Questions
How Do You Know When the Trichomes on Your Cannabis Are at Peak Maturity?
Look for mostly cloudy or milky trichomes for peak THC potency. Clear trichomes mean the plant is immature. Amber trichomes signal over-maturity and more sedative effects.
What Percentage of Pistils Should Darken Before Harvesting Cannabis?
Aim for 70 to 90 percent of pistils to turn orange or brown. This shows the buds have ripened well and are nearing optimal harvest time.
Can the Smell of Cannabis Help Tell If It’s Ready to Harvest?
Yes, a strong and pungent scent often means the cannabis is ready. Immature buds usually have a weaker smell, so watch for that pop of aroma.
How Does Strain Type Affect Cannabis Harvest Timing?
Different strains mature at different rates, affecting harvest time. Indicas, sativas, and hybrids vary, so check your strain’s typical timeline carefully.
Why Is Flushing Important Before Harvesting Cannabis?
Flushing removes excess nutrients and improves final taste and burn quality. Start flushing about two weeks before harvest for the best results.
What Happens If You Harvest Cannabis Too Early?
Harvesting too early reduces potency and overall yield. Buds won’t have developed full cannabinoid levels or flavors yet, so you lose quality.
Key Points to Remember
Harvest timing makes a big difference in your cannabis’ potency and taste. Spot the trichomes and pistils to know when your buds are ripe. Start your flush and prepare your drying space this week for the best results.