How to Build a Greenhouse for Winter: A Complete Guide with Proven Tips
Knowing how to build a greenhouse for winter means keeping plants warm and healthy. The key is strong insulation combined with smart design that traps sunlight. A good winter greenhouse stays 10 to 15 degrees warmer than outside, even at night.
Start by choosing a spot with lots of sunlight. Make sure it gets 6 to 8 hours of direct sun every day. This is key for healthy plant growth.
Face your greenhouse south or southeast to catch the most sun in colder months. Angle the glazing to match your latitude plus about 15 degrees for best solar gain.
Use thermal storage like water barrels inside to hold heat through chilly nights. Secure each barrel well because they weigh over 400 pounds when full. This helps the greenhouse stay warm without burning extra fuel.
Key Takeaways
- Place your greenhouse where it gets 6 to 8 hours of direct sunlight daily.
- Face the greenhouse south or southeast for maximum winter sun exposure.
- Set glazing at your latitude plus 15 degrees for optimal heat absorption.
- Use 5 to 8 water barrels inside to store heat overnight effectively.
- Secure barrels firmly to prevent tipping hazards and maintain safety.
- Maintain internal temperatures between 50 and 70°F depending on crops.
How to Build a Winter Greenhouse That Retains Heat Efficiently

Keeping heat inside your winter greenhouse starts with a solid plan. Use sturdy, insulated materials that block cold air and absorb sunlight. Adding thermal mass helps store daytime heat and releases it overnight to keep plants warm.
Wood frames paired with corrugated metal work well for durability. Cover the structure with polycarbonate panels or thick greenhouse plastic to trap warmth. Black plastic barrels filled with water make excellent thermal mass.
The barrels soak up sun heat during the day. They release it slowly at night. This warms night temps by 10 to 15 degrees in winter.
Follow these steps to build a greenhouse that holds heat effectively:
- Anchor the Foundation Deeply. Dig holes at least 2 feet deep for frame posts to resist snow load and wind. Use treated wood or steel for stability.
- Build a Strong Frame. Construct the frame using wood or corrugated metal. Use galvanized nails and screws to secure joints tightly.
- Install South-Facing Glazing. Attach polycarbonate panels or greenhouse plastic on a steep south-facing angle. This maximizes winter sunlight capture.
- Set Up Thermal Mass. Place 5 to 8 black plastic barrels filled with water inside. Position them where they get full sun during the day.
- Add Insulation. Seal gaps with foam strips and caulk. Apply extruded foam insulation on north and side walls if possible to reduce heat loss.
- Install Shelving and Plant Racks. Arrange racks to avoid shading barrels or blocking sunlight. Improve plants for better warmth circulation.
- Check and Maintain Seals. Regularly inspect edges, doors, and vents. Replace worn plastic and reapply caulk before cold weather.
- Vent Carefully. Use tight-fitting vents to allow airflow without large heat loss. Open only during the warmest parts of the day.
This process takes a few days to a week, depending on size and materials. Expect to spend $200 to $600 for a small greenhouse. It measures about 8×12 feet.
Most costs go towards glazing and thermal mass barrels. Good thermal mass keeps your greenhouse warm on cold nights. It protects plants from frost damage.
This helps plants survive winter better. Gaps or poor sealing cause frost inside.
Make sure barrels are painted black to absorb more heat. Don’t block their sunlight with clutter or shading.
Optimizing Location, Orientation, and Sunlight for Winter Growth
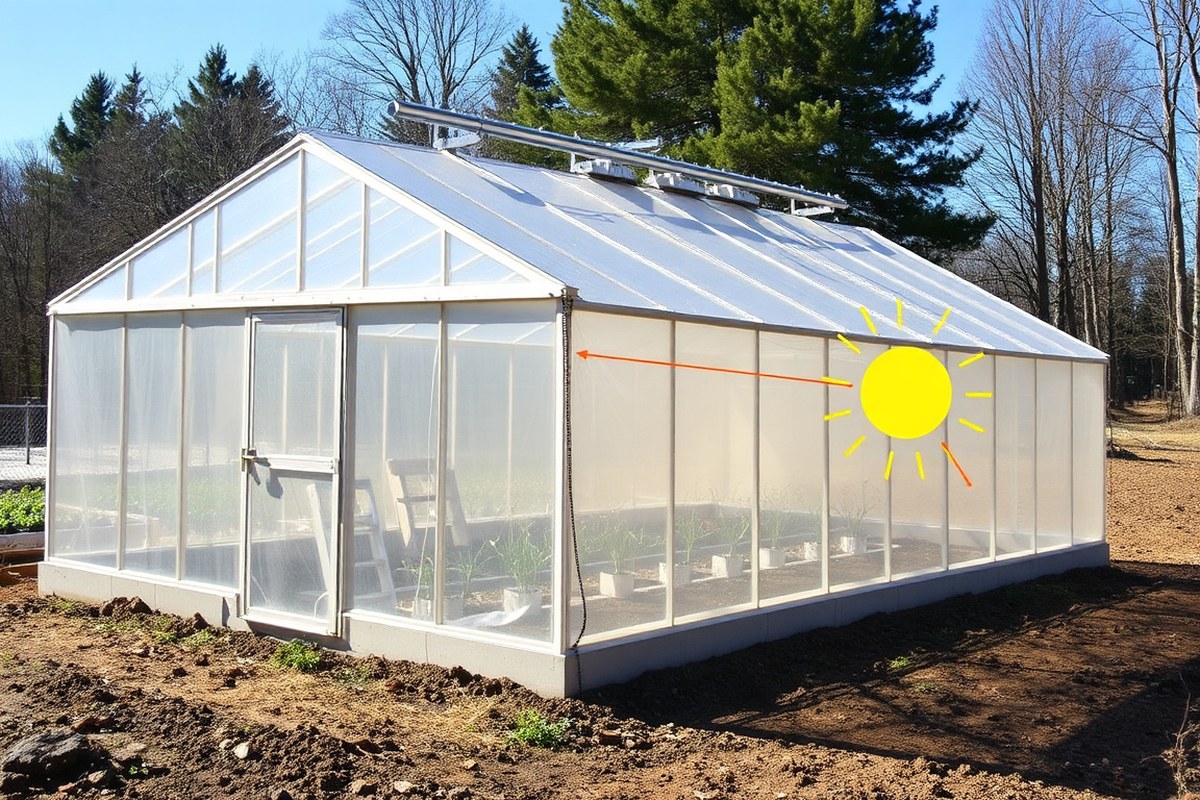
Choose a site with at least 6 to 8 hours of direct sunlight daily. Look for an open spot with no buildings or trees shading the greenhouse. The more unobstructed southern sky you get, the better your winter plants will grow.
Face the greenhouse long wall true south, not magnetic south. Use a compass with a declination adjustment or an app showing true north.
Facing true south gets the most winter sun. This can improve passive solar heating by 20 to 40 percent.
Set the glazing angle on the southern wall at your latitude. Add 15 degrees to maximize solar gain. If your latitude is 40 degrees, tilt the glass at 55 degrees.
This helps catch more sun in winter. This angle helps sunlight reach the greenhouse floor and warms the air inside more effectively.
Protect the greenhouse from strong north and west winds without blocking sunlight. Plant evergreen shrubs 15 to 30 feet from your greenhouse. This creates a windbreak that cuts cold gusts.
Don’t plant tall trees or build structures south of the greenhouse. They can cast shadows during sunny hours.
Water barrels on the north interior wall can store heat and release it during cold nights. This method keeps your greenhouse 10 to 15 degrees warmer without extra energy costs. Make sure the barrels are dark-colored and filled to maximize heat absorption.
Make sure to double-check your site’s compass declination before orienting the greenhouse. A few degrees off can lower solar gain significantly.
Foundation and Structural Anchoring for Cold and Snowy Climates
| Foundation Type | Frost-Prone Soil Suitability | Installation Depth & Width | Cost Range | Durability & Notes |
|---|---|---|---|---|
| Concrete Slab | Excellent | Trench 16 in wide, 8 in deep; slab 4-6 in thick | $500-$1200 | Very stable, resists frost heave, heavy, needs curing time |
| Pressure-Treated Wood Frame | Good | Use deep posts below frost line (12-18 in), frame 16 in wide | $150-$400 | Affordable, easier to build, but can rot without proper sealing |
| Gravel with Perimeter Beam | Moderate | Base trench 16 in wide, fill gravel 8 in deep, beam on top | $100-$300 | Drainage prevents frost heave, but less rigid under heavy snow |
| Old Windows/Doors Frame | Low | Shallow base, surface-level anchoring | Very low, reuse materials | Cheap, good for small cold frames, not for heavy snow loads |
Digging a trench about 16 inches wide and 8 inches deep suits most winter greenhouses. The outline should be roughly 8 ½ feet square if your greenhouse measures about that size. Use sturdy framing material inside the trench for a firm perimeter base.
Anchoring against wind and snow needs solid methods. Drive rebar stakes at least 12 inches deep around edges. This helps secure posts or frames.
It keeps your structure stable in wind. Concrete footings provide added weight and resistance. Barrels used as water drums must be tied down tightly to stop rolling and tipping.
- Check frost depth in your zone; set posts deeper than frost line.
- Use heavy-duty anchors like ground screws or long rebar rods.
- Tightly screw or strap frame connections to prevent movement.
- Cover and seal wood to extend lifespan against moisture.
- Use old windows for small cold frames but avoid for heavy snow.
- Secure barrels firmly to a fixed base to prevent hazards.
Concrete foundations resist frost heave best but cost more and take time to cure. Treated wood frames are cheaper, faster, and well suited if you place posts below freezing depth. Gravel bases help with drainage and reduce frost problems.
They are not strong under heavy snow. Consider this before you choose gravel.
Low-cost alternatives like using reclaimed windows or doors work for very small, protected setups. Avoid placing these in open, snowy areas. Use a solid anchored base for extreme cold or heavy snow.
It protects your greenhouse for many years. This base is worth the cost. Checking weight limits and regularly inspecting fasteners prevents surprises in winter storms.
Insulation Strategies to Minimize Heat Loss in Winter Greenhouses
Clear polyethylene plastic is a top insulation choice for winter greenhouses. It lets sunlight in while keeping cold air out.
Double layers with a 1-inch or greater air gap increase insulation value significantly. Bubble wrap is another popular option that works well inside your greenhouse walls.
To install bubble wrap, cut it to greenhouse panel size and spray the panels with water. Then gently press the bubble wrap onto the surface.
The water helps it stick without adhesives, which could block light or damage panels. You can reuse bubble wrap if handled carefully.
Old single-pane windows can add insulation while still letting light inside. Placing them on the coldest side reduces drafts.
This DIY method is budget-friendly and effective for small greenhouses. Just watch for cracked glass that might lower heat retention.
Good insulation traps heat but raises humidity, risking fungal growth. To avoid this, open vents or doors for short periods during the warmest times of day. Running a small fan can help circulate air and reduce condensation on cold mornings.
Installing a thermostat-controlled ventilation system lets you match humidity and temperature needs closely. Keeping daytime humidity below 60% reduces mildew risk. Use moisture-absorbing trays or gravel trays with water to balance humidity too.
Polycarbonate panels last longer than plastic films but cost more upfront. Typical warranties run around 10 years.
If using plastic sheeting, plan to replace it every 3 to 5 years since UV exposure weakens the material. Replacing coverings before they crack or tear maintains insulation and sunlight access.
Adding removable row covers inside during freezing nights adds another layer of warmth. Lightweight quilts or frost blankets can protect sensitive plants without blocking too much light. Remove these covers during the day to prevent overheating and moisture buildup.
Ventilation and Moisture Control Without Losing Heat
Ventilation in a winter greenhouse must stop humidity without cooling too much. Use roof vents for warm air to escape and install side vents for fresh air entry.
Fans can help move air. But only run them when humidity spikes or heat is stable.
Types of Ventilation Systems
Roof vents are your best choice because hot air rises naturally. They let warm, moist air leave while protecting from drafts. Side vents help by bringing cooler air at plant level, balancing airflow.
Small, electric fans can push air if passive venting isn’t enough. Place fans near vents for even circulation and to avoid cold spots. Choose fans with thermostats, so they run only when needed.
Controlled intake and exhaust vents prevent sudden cold air blasts. You can manually open them wide or crack them slightly depending on temperature. Automatic vents with sensors cost about $50 to $150 and make life easier.
Daily Ventilation Best Practices
Open vents during warm daylight hours, usually for 1 to 3 hours. This prevents overheating and lets humidity escape before evening. Close vents before the sun sets to keep warmth inside at night.
Check greenhouse temperature with a thermometer before opening vents. When it reaches 75°F or higher, open vents; below 60°F, keep them mostly closed. On very sunny winter days, vent early to avoid heat stress on plants.
Fans should run briefly, about 15 to 30 minutes, only if it’s humid and warm inside. Avoid running fans on cold days when the temperature is below 50°F. This saves energy and keeps plants from chilling.
Managing Humidity and Mold
High humidity encourages mold and fungal diseases like powdery mildew. Ventilation lowers humidity and prevents condensation on leaves and soil. Avoid overwatering plants to reduce moisture buildup.
Place vents high to let warm air escape from your plants. Keep vents low enough so cold wind doesn’t hit plants. This helps protect plants while allowing airflow.
Around 4 to 6 feet high is optimal, depending on greenhouse height. Use a hygrometer to monitor relative humidity; keep levels below 70% for healthiest plants.
Try these tips for moisture problems:
- Open vents daily during any warm period
- Run fans only when humidity rises above 70%
- Water plants early in the day to dry soil before night
- Tilt or angle beds for better drainage and airflow
- Use absorbent materials like gravel around pots to reduce moisture
- Keep doors closed when not in use to maintain stable conditions
Watch condensation on greenhouse walls. It signals you need more fresh air without losing heat.
Choosing Plants and Planning Crops for Winter Greenhouses
Winter greenhouses suit plants that handle cool temperatures well. Keep your greenhouse temperature between 50 and 70°F. This range suits winter crops well.
It works great for kale, spinach, and carrots. These leafy greens and root vegetables thrive in chilly settings without extra heat.
Herbs such as thyme, parsley, and chives also grow well near freezing. Fresh herbs stay happy with minimal warmth and steady moisture. Flowers like pansies and snapdragons tolerate the cold and bring color inside when winter feels long.
Mini hoop houses covered with row fabric add 5 to 8 extra degrees around sensitive plants. Use these inside your greenhouse to protect young seedlings or herbs from frost. They cost little and are easy to set up on benches or over containers.
Plan crops by grouping plants with similar temperature needs together. Put hardier greens near the colder zones and heat-loving ones closer to the sunniest spots. Rotate crops section by section to keep soil healthy and avoid pest build-up.
Water plants carefully in winter when growth slows down. Check soil moisture twice a week, watering only when the top inch feels dry. Avoid overwatering since cold roots suffer in soggy soil and may develop rot.
Place your greenhouse in full sun and on well-drained ground to prevent frost from pooling. Keep airflow moderate to reduce mold but make sure you don’t lose too much heat. This balance helps your winter crops stay strong and healthy.
Backup Heating Options for Extreme Cold and Extended Freezing
Backup heating is important when temperatures fall below 0°F and stay that low for several days. This extreme cold threatens crops that are not frost-hardy. Using supplemental heat can protect your plants during these severe cold snaps and long freezes.
Types of Backup Heaters
Electric heaters are common and safe for winter greenhouses. They provide steady heat without producing carbon monoxide. Propane or kerosene heaters generate more heat but require ventilation to avoid toxic fumes.
LPG heaters cost more upfront but deliver quick warmth during intense cold. Ceramic heaters offer focused heat and use less energy compared to traditional electric models. Choose a heater that suits your greenhouse size and power access.
Here’s a quick look at heater types:
- Electric space heaters: Safe, easy to use, no fuel storage
- Propane or kerosene heaters: High heat, need ventilation
- Ceramic heaters: Energy-efficient, good for spot heating
- Infrared heaters: Direct plant heat, low air warming
Each type fits different budgets and greenhouse sizes. Electric heaters cost \( $50 \) to \( $150 \).
Propane units run \( $100 \) to \( $300 \). Consider fuel availability when choosing.
Safe Heater Placement
Position heaters away from plants to avoid burning foliage. Keep a three-foot clearance on all sides for safety and airflow. Place heaters on stable, level surfaces to prevent tipping.
Heat should distribute evenly to prevent cold spots inside the greenhouse. Use small fans to circulate warm air if the heater’s output is concentrated. Avoid placing heaters where water can drip on them to reduce shock risk.
When to Turn on Heating
Turn on backup heating if night lows approach 20°F or below for tender crops. Use heaters anytime nighttime temperatures hit zero or less for days in a row.
Avoid running heaters all day to save energy. Focus on coldest hours, usually after sunset until before sunrise.
A programmable thermostat can help control temperature efficiently. Set it to kick on below 32°F for frost prevention or below 20°F for stronger heat. Keeping the greenhouse just above freezing protects roots and leaf tissues.
Timeline and Budget Checklist for Building a Winter Greenhouse
Building a winter greenhouse usually takes about two to four weeks, depending on size and materials. You’ll budget for the frame, covering, foundation, insulation, and small tools or hardware. Doing the steps in a smart order saves time and cuts surprises in cost.
Site Preparation and Foundation
Choose a flat spot with good sunlight and easy access to water and power. Sketch your greenhouse size first. Check if local rules need permits.
Permits usually apply if it’s over 120 square feet or uses concrete. Clearing the site and preparing the foundation takes about a week.
The foundation supports your frame’s weight and anchors it against wind or snow. Common base options include gravel, wood sleepers, or concrete pads. Gravel starts at $50.
Concrete slabs cost $700 or more. Treat wood for rot if using 2×4 frames leaning on a wall.
Frame and Covering Installation
The frame shapes your greenhouse and holds the covering tight. Aluminum frames cost more upfront, around $500, $900 for a 10×12 size.
But last years and resist snow loads. Budget options like cattle panels cost under $200 but have limited headroom and feel cramped.
Coverings vary from polyethylene sheeting to polycarbonate panels. Polyethylene costs about $50 upfront and $100 every 2-3 years. Polycarbonate panels cost between $150 and $500 one-time.
Polycarbonate lasts longer and insulates better. After securing the frame, wrap or panel the structure carefully, sealing edges against drafts.
Insulation, Ventilation, and Finishing Touches
Add bubble wrap or thermal curtains inside for extra insulation. Costs for insulation materials vary but plan about $100, $250 for a modest-sized greenhouse.
Good ventilation avoids overheating and moisture problems. Install vents or roll-up sides you can open briefly on sunny days.
Finishing touches include door sealing, shelving, and watering systems. Small investments in vent covers and weather stripping prevent heat loss.
This step takes 3 to 5 days, depending on complexity. It helps lower heating bills during cold spells.
- Clear and level your site for sunlight access and work space.
- Build or install your foundation suited to your climate.
- Assemble and anchor the frame securely to resist snow and wind.
- Attach covering tightly, sealing all edges to prevent drafts.
- Install insulation inside the frame, focusing on north and west walls.
- Fit ventilation options like side vents or roof windows.
- Add doors, sealants, and shelving to prepare for planting.
- Test ventilation and insulation before winter sets in.
Plan your budget with a 10, 20% extra for surprises like extra sealant or fasteners. Avoid rushing the frame setup; loose or wobbly frames cause leaks and heat loss.
Step-by-Step Action Plan
Follow this plan to build your winter greenhouse and get plants growing. Each step shows what to do and how to check your progress.
- Before you start: Pick the best sunny, south-facing spot with good wind protection. Check sunlight by watching shadows midday.
- Week 1: Lay a sturdy, level foundation using concrete or pressure-treated wood. Test stability by pushing on the frame.
- Week 2: Assemble the greenhouse frame with strong anchors to hold against snow. Confirm anchors stay secure in windy weather.
- Week 3: Add double-layer insulated panels or polycarbonate sheets for walls and roof. Touch the interior wall to feel less cold.
- Week 4: Install adjustable vents near the top for moisture control, avoid drafts by sealing gaps. Watch for fog inside as a humidity sign.
- Week 5: Set up backup heating like a small electric heater or propane option. Ensure the heater keeps the air above freezing.
- Week 6: Plant cold-hardy greens and herbs. Check seed packets for growing time and germination rates.
- After 2 weeks of planting: Monitor plant growth and adjust watering or ventilation as needed. Look for healthy green leaves and no mold.
Frequently Asked Questions
What Materials Work Best for Building a Winter Greenhouse Frame?
Wood and corrugated metal are common choices for frames. They hold up well.
They support coverings like plastic or panels. These keep heat inside during winter.
Can I Add Shelves or Benches Inside a Winter Greenhouse?
Yes, built-in racks or benches save space and boost plant capacity. Plan them sturdy enough to hold pots and tools, making your gardening easier all winter.
How Can I Use Thermal Mass to Keep My Greenhouse Warm?
Placing water barrels inside stores heat during the day and releases it at night. For an 8×12-foot greenhouse, five to eight barrels work best.
They keep temperatures 10 to 15 degrees warmer. This helps on cold nights.
What’s the Best Way to Anchor a Greenhouse Foundation in Snowy Areas?
Dig footings below the frost line to stop shifting from freeze-thaw cycles. Secure the frame firmly with anchors deep enough to handle heavy snow and wind loads.
How Do I Control Humidity in a Winter Greenhouse Without Losing Heat?
Use small, adjustable vents to let moisture out while keeping warmth in. You can also add a dehumidifier or open vents during sunny periods for fresh air.
Can I Grow Warm-Weather Plants in a Winter Greenhouse?
Warm-weather plants like eggplants usually need extra heating and airtight conditions. Many gardeners focus on cool-season crops to avoid high energy costs during cold months.
Key Points to Remember
A well-built winter greenhouse lets you grow fresh plants even in freezing weather. Start by picking the right site for your structure. Then, gather materials to build a solid base and frame this week.