Do Coreopsis Spread? How to Control Growth and Boost Garden Success
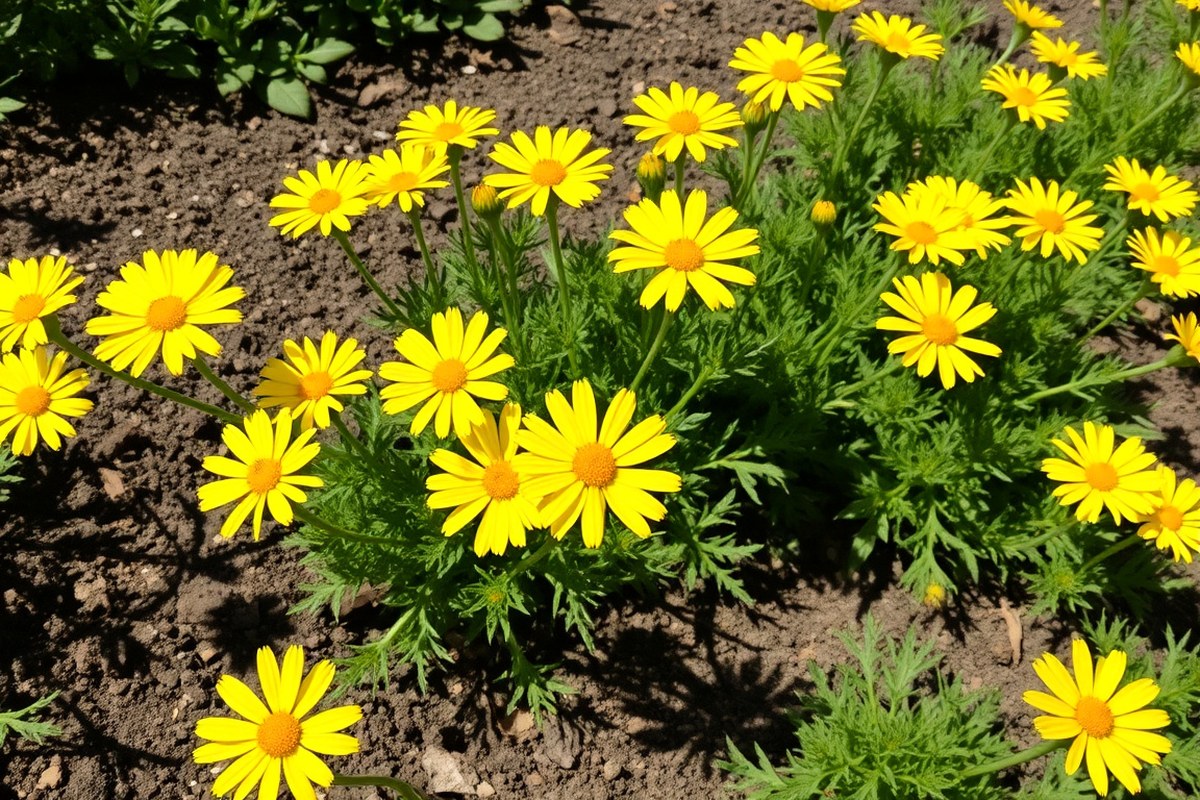
Do coreopsis spread in your garden? Yes, coreopsis plants naturally spread out over time. They typically grow 6 to 48 inches tall.
Their spread can reach 12 to 36 inches wide. This growth depends on the coreopsis variety and conditions around it.
Coreopsis plants spread mainly through seed dispersal and root spread. Seeds can drop and grow nearby.
Roots help the plant cover more ground each year. Knowing this helps you manage how much space they take up and control their growth.
Plant coreopsis with enough space for its natural spread. About 20 to 36 inches apart works well.
Watch for signs of unwanted spreading, like seedlings popping up too close to other plants. You can also use physical barriers to keep their roots contained while keeping the plants healthy.
Key Takeaways
- Coreopsis spread naturally by seeds and roots, so expect new plants nearby.
- Plant coreopsis at least 20 inches apart to allow room for growth.
- Tall varieties like Coreopsis tripteris can grow up to 7 feet tall.
- Use plastic edging or metal strips 6-8 inches deep to limit root spread.
- Cold stratify your coreopsis seeds for 2-4 weeks for better germination.
- Divide coreopsis plants every 3-4 years to control their size and spread.
How Do Coreopsis Plants Spread Naturally?
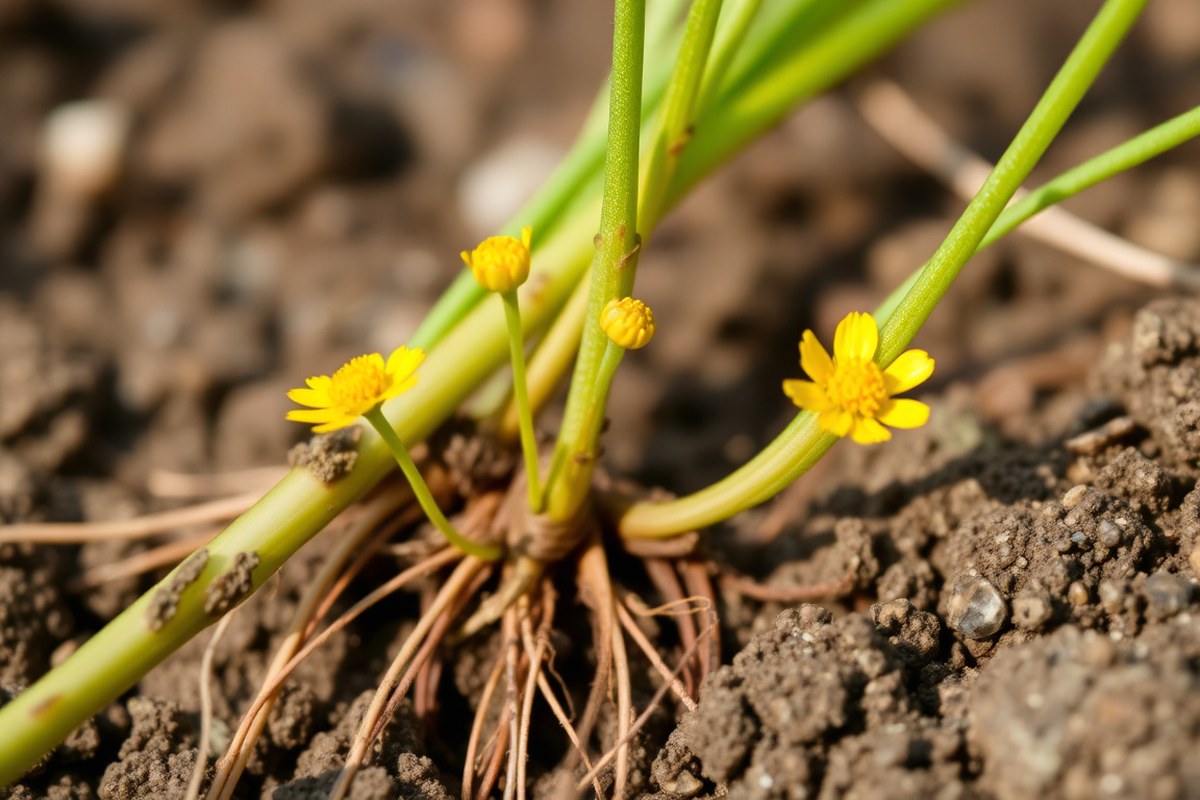
Coreopsis plants spread naturally by two main methods: underground rhizomes and seeds. Some species produce rhizomes, which are horizontal stems that grow below the soil surface. Each spring, these rhizomes grow new shoots.
They help the plant spread fast. This makes dense mats in your garden space.
Rhizome growth happens as the plant puts energy into extending these underground stems. Conditions like moist, nitrogen-rich soil and full sun help rhizomes lengthen faster. Too much nitrogen makes leaves grow lush.
It also creates more rhizome buds. This helps the plant spread underground faster.
In addition to rhizomes, coreopsis plants self-seed prolifically each year. A mature plant makes hundreds of tiny seeds. Some fall to the ground nearby.
Others spread by wind and water. Seeds start to grow after the season begins.
They need moist soil and warm temperatures. These conditions help the seeds germinate well.
Self-seeding lets coreopsis colonize new areas farther from the original plant. Seedlings grow scattered and less dense than rhizome shoots. So flower beds may look patchy.
Seeds often must stay cold for 2 to 4 weeks. This cold period is called stratification. It matches natural winter patterns nicely.
Different species rely differently on rhizomes or seeds. For example, Coreopsis verticillata spreads primarily through rhizomes, forming moderate to fast-growing dense patches. Coreopsis tinctoria spreads by heavy self-seeding.
It grows quickly but in scattered spots. This differs from other spreading methods.
Together, rhizomes fill in open garden spaces fast. Seeds help the plant move into new spots. Knowing how coreopsis spreads helps you control it.
You can stop it from taking over your garden. This makes managing your plants easier.
Which Coreopsis Species Spread Fastest and How to Identify Them

Not all coreopsis types spread at the same rate or by the same method. Some species spread fast through underground runners. Others grow in clumps with limited spreading.
Annual coreopsis usually grow and flower quickly but die each winter. So they don’t spread year after year like perennials do.
Knowing which coreopsis species spread fast helps you decide where to plant them. For smaller garden spaces, slower spreading, clump-forming types work best.
Faster spreading species need more room or barriers to keep them from crowding other plants. Your climate also affects spread speed, with warmer zones helping some species grow faster.
| Species/Variety | Spreading Method | Spread Speed | Suitability for Confined Spaces |
|---|---|---|---|
| Coreopsis verticillata (Threadleaf tickseed) | Slow clump forming | Slow (spreads over 3-5 years) | Best for small spaces |
| Coreopsis lanceolata | Clumping with seed self-sowing | Moderate (seasonal seed spread) | Good if managed |
| Annual Coreopsis spp. | Rapid seed spread | Fast (one season bloom and spread) | Not for long-term confined planting |
| Coreopsis grandiflora | Clump forming minus aggressive runners | Moderate | Suitable for medium spaces |
| Coreopsis tinctoria | Annual, self-seeding | Fast seed spread | Less suited for tight spaces |
Perennial varieties like Coreopsis verticillata spread slowly by expanding clumps. They can live many years without aggressive growth, making them perfect for tight gardens. Coreopsis tinctoria is a fast-spreading annual plant.
It blooms for one season and spreads seeds quickly. These plants fill bare spots fast but die after frost.
In warmer zones 7-9, some perennials grow larger and spread faster. That speed means they may crowd other plants if not checked.
Dividing clumping perennials every three to five years keeps them healthy and contained. Raised beds or root barriers help control underground spread in areas where coreopsis can become invasive.
Use root barriers if you spot vigorous underground runners to protect nearby plants.
How Long Does It Take Coreopsis to Spread in Your Garden?
Typical Timeframe for Coreopsis to Spread
Coreopsis usually begins noticeable spread within its first growing season. You can expect a visible mat of plants in about 6 to 12 months. Some species take longer and may need up to two years to fully establish.
A new baby coreopsis from a nursery pot grows faster. It fills in quicker than one grown from seed. This makes nursery plants a good choice for quick coverage.
That’s because it skips the slow seedling stage. The key is steady moisture and good sunlight for faster expansion.
How Far Coreopsis Expands in a Garden
Coreopsis plants tend to expand by about one to two feet every year. This varies widely based on species and environment. For example, low-growing varieties fill a two-foot-wide patch over a single season.
Tall Tickseed (Coreopsis tripteris) grows 4 to 7 feet tall. It spreads mostly by seedlings, not runners. This plant prefers to reseed itself in your garden.
With a long growing season and open space, seedlings can sprout. They may appear 15 centimeters or more from the parent plant. This shows coreopsis can spread widely.
Climate Zone Impact on Spread Rate
Coreopsis thrives in USDA zones 4 to 9. It grows steadily in temperate to warm climates where summers are sunny and moderately moist. In colder zones, spread slows due to a shorter growing season.
In hot, dry areas, spread may stall unless you supplement watering. Conversely, prolonged wet conditions can cause root or crown rot, which sets back plants. Coreopsis adapts well but needs balanced moisture for steady expansion.
Factors That Speed or Slow Spread
Sunny, moist conditions encourage fast growth and dense root expansion. The plant can quickly create a thick, uniform leaf carpet within one season. You may also see rhizomes pushing up through the soil near the plant base.
Too much shade or drought slows spread. Under shady conditions, plants grow taller but less wide.
Dry spells make coreopsis pause spreading as the plant conserves water. Regular deadheading helps coreopsis bloom longer but has less impact on how fast it spreads underground.
Signs Coreopsis Is Actively Spreading
Look for rhizome tips visible at the soil surface. These tips appear especially near plant edges. Seeing many scattered seedlings 15 centimeters from the main clump shows prolific self-seeding is underway.
Nearby plants showing yellow leaves or slow growth means crowding. Your coreopsis might be competing for water and nutrients. Watch for crowded roots and stems.
That means it has spread enough to dominate the area. At this point, pruning or thinning may be needed to keep plants healthy.
How Growing Conditions Affect Coreopsis Spread Rates
Coreopsis plants grow best in well-draining soil. This type of soil prevents root rot diseases that slow or stop spreading. Avoid heavy clay or waterlogged soils to keep roots healthy and spreading strong.
Sunlight plays a big role in how fast coreopsis spreads. These plants prefer full sun, which means at least 6 hours of direct light daily. More sun encourages vigorous growth and frequent flowering, leading to quicker spreading across your garden.
Moisture levels also affect spread rates. Coreopsis needs moderate water, too much moisture invites fungal diseases like powdery mildew and root rot.
Stick to watering deeply but less often. Let the soil dry out between waterings to keep your plant growing steady.
In warm, humid climates coreopsis can spread aggressively, sometimes becoming invasive. Cooler or drier areas slow growth and spread. Adjust expectations and maintenance based on your local weather and moisture conditions to avoid unwanted overgrowth.
You can start coreopsis indoors 4 to 6 weeks before planting outside. This jumpstarts growth in controlled conditions. When ready, transplant it into soil like before.
Use similar sun conditions. This keeps spreading rates healthy and steady.
Planting and Spacing Strategies to Manage Coreopsis Spread
Plant coreopsis with enough room for healthy growth while controlling spread. Space plants based on the bed size and type to prevent overcrowding. Keep plants at least 6 to 8 inches from hardscape to avoid damage and allow maintenance.
Ideal Spacing Distances for Popular Coreopsis Types
Coreopsis spacing depends on the garden context and plant species. Give fast-spreading types more room to avoid crowding neighbors. Smaller beds need tighter spacing compared to large naturalized areas.
Follow this spacing guide for best results:
- Small flower bed: 12 to 15 inches between plants
- Medium mixed border: 18 to 24 inches apart
- Large meadow or naturalized area: 24 to 36 inches spacing
- Containers: 12 inches apart due to limited root space
- Near walkways or lawn edges: keep plants 6 to 8 inches from the hardscape
Give each coreopsis enough room to fill its mature width without crowding. Lance-leaf types may need extra attention for seed spread.
Using Physical Barriers to Limit Rhizome Spread
Physical edging can keep coreopsis from spreading into unwanted areas. Use plastic or metal strips sunk 6 to 8 inches deep for effective control. These barriers stop rhizome runners but don’t hurt the plant.
This method works well along borders near paths or lawns. You can also use containers to confine root expansion and reduce self-seeding. However, still check for seedlings around the container’s edges.
Note that seedlings may pop up beyond barriers. So inspect regularly and remove unwanted sprouts promptly.
Physical barriers require some investment but protect your beds with minimal effort. Installation often takes less than an hour for a small border.
Preparing Soil and Site for Balanced Growth
Plant coreopsis in well-drained soil to discourage overly aggressive spread. Move plants to drier locations if seedlings keep appearing too close to the parent. Avoid raw ground near hardscape to reduce invasions.
Before planting, loosen soil about a foot wide and 6 inches deep. Add compost to balance moisture and fertility. Healthy soil encourages steady but controlled growth.
- Remove competing weeds and debris from planting site
- Ensure site receives at least 6 hours of sun daily
- Improve drainage by mixing sand or grit if soil is heavy
- Apply compost or organic matter to enrich soil
- Plant coreopsis at soil level, avoiding burying crowns
Watch soil moisture carefully during the first two months after planting. Coreopsis rhizomes usually stay 1 to 3 inches deep. They grow new shoots when soil reaches 50°F or warmer.
Maintenance Practices to Control Coreopsis Growth and Spread
You can control how much coreopsis spreads by pruning, deadheading, and dividing clumps regularly. These practices keep the plant healthy and prevent it from overcrowding your garden. Proper maintenance also encourages more blooms and a neat appearance.
Best Times to Prune and Deadhead Coreopsis
Prune your coreopsis during late winter or early spring before new shoots appear. Trim the plant down to 4-6 inches above the soil. This approach shields the crowns and promotes fresh spring growth.
Deadheading spent flowers keeps your coreopsis blooming through the summer. Removing faded blooms stops seed formation, which slows self-seeding and unwanted spread. You can deadhead every week or two during the growing season to maintain continuous flowers.
How and When to Divide Coreopsis Clumps
To keep coreopsis healthy, divide it every 3 to 4 years to avoid crowding. The best time to divide is late fall or early spring, when soil allows easy digging. This timing cuts stress and helps the plant bounce back before active growth.
Notice fewer flowers or a dying center in your coreopsis clump? That signals it’s time to divide the plant.
Simply dig up the clump and split it into smaller sections. Replant these with enough space between each to allow healthy expansion.
- Dig carefully around the root ball to avoid damage
- Separate healthy, vigorous shoots from old woody centers
- Replant divisions at the same soil depth they grew before
- Water well after replanting to help establish roots
- Check plant tags for recommended spacing
- Remove dead or diseased parts during division
Dividing can keep your coreopsis dense and flowering well. It also prevents the clump from getting too large and taking over nearby plants.
Recognizing Overcrowding and Its Signs
Overcrowded coreopsis slows bloom production and looks scruffy. You’ll see fewer flowers and smaller leaves in the center of the plant. Sometimes the center starts to die back, a sign the plant needs dividing.
Another sign is when runners or clumps push beyond their intended bed edges. This may require rhizome pruning or installing an edging barrier. Keeping an eye on spread helps maintain order and plant health.
Common Mistakes That Cause Unwanted Coreopsis Spread
One big mistake is planting coreopsis too close to other plants. These plants spread 1 to 2 feet wide.
So tight spaces let them take over. To keep them contained, make sure they have enough room to grow.
Another error is ignoring coreopsis’s rhizomatous growth. This means the roots send out shoots underground, which pop up nearby. Without cutting back or digging up runners, your coreopsis can outgrow its area fast.
Trying to propagate coreopsis by dividing plants in late fall or early spring can cause problems. The divisions might rot if the soil stays too wet or cold. Wait for warmer, drier times and keep divisions moist but not soggy after planting.
- Plant coreopsis at least 2 feet apart from other plants
- Regularly trim runners to prevent underground spread
- Divide plants in late spring or early summer for best results
- Keep soil well-drained to avoid root rot during propagation
- Monitor new shoots and remove any that encroach on other plants
Signs that coreopsis spread is getting out of control include dense patches crowding out neighbors. You might see runners sending up shoots far from the original plant.
This especially happens in rhizomatous types. They need active trimming or digging.
Being too passive with spread management also often means rot sets in. This can slow down growth and cause bare spots where the roots died. Keeping the soil well-drained and avoiding overwatering helps prevent this problem while limiting a wild takeover.
Tools and Techniques to Limit or improve Coreopsis Spread
Physical barriers can slow but not completely stop coreopsis from spreading underground. Installing root barriers at least 12 inches deep helps contain rhizomes. These plastic or metal strips direct runners downward or block them.
Make a trench and press the barrier firmly into the soil. Leave a few inches above ground to discourage surface runners too.
Root pruning is a reliable way to control spread during the growing season. Dig around the plant’s edge every 12 to 18 inches to cut rhizomes. Doing this once or twice a year prevents coreopsis from invading other beds.
Use sharp garden shears or a spade to sever roots cleanly. This works best when soil is moist but not soggy.
To boost coreopsis growth safely, you can divide mature clumps in early spring or late fall. Lift a portion of the plant with roots intact and replant it elsewhere. Divisions usually establish quickly with regular watering and some shade at first.
This method gives you new plants without encouraging invasive spread. Avoid transplanting pieces accidentally left underground near other plants or pathways.
If you find your coreopsis out of control or you can’t manage root pruning and barriers, call a professional landscaper. They can safely remove or contain aggressive clumps using specialized tools.
This service can cost $200 to $500 depending on how much needs removal. Professionals also advise on the best varieties to plant based on your garden size and conditions.
Coreopsis runners can sneak past shallow barriers, so dig deep and check edges yearly.
Step-by-Step Action Plan to Manage Coreopsis Spread
Follow these steps to control coreopsis growth and keep your garden tidy.
- Before planting: Choose the right coreopsis species based on how fast they spread. Look for slower-spreading types if you want less maintenance. You’ll know you chose well if your garden stays manageable after the first bloom.
- Week 1: Space your coreopsis plants 12 to 18 inches apart. This space helps limit overcrowding and spread. Check spacing after planting to confirm proper distance.
- After 2 weeks: Apply mulch around the plants to slow seed dispersal. Mulch also keeps soil moist, which supports healthy growth without over-expansion. You’ll see fewer volunteer seedlings near your beds.
- Month 2: Deadhead spent flowers regularly to reduce seed spread. This stops new plants from popping up everywhere. Notice fewer unwanted seedlings when you deadhead consistently.
- Month 3: Dig and divide crowded clumps every 2 to 3 years. Dividing helps control spread and boosts plant health. Check for less thinning and better bloom after dividing.
- Monthly: Inspect garden edges and paths for stray seedlings. Pull them out early before they take hold. You’ll spot fewer cores spreading to unintended places.
- When needed: Use a sharp spade or garden shears to trim back overgrown areas. Cutting back keeps spread in check and preserves your garden design. Your coreopsis will stay neat and under control.
Frequently Asked Questions
Do Coreopsis Plants Spread by Both Seeds and Rhizomes?
Yes, coreopsis spread by both seeds and underground rhizomes. This dual method varies by species and influences how quickly they occupy garden space.
Can Coreopsis Spread Aggressively in Humid Climates?
Coreopsis tends to spread aggressively in warm, humid zones. These conditions promote self-seeding and rapid rhizome growth, making control harder.
Does the Spread Rate of Coreopsis Change in Different USDA Zones?
Yes, they spread faster in warmer zones like 7-9. Longer growing seasons and mild winters boost seed and rhizome activity.
How Can Over-Fertilizing Affect Coreopsis Spread?
Too much high-nitrogen fertilizer makes coreopsis grow lush foliage. This also encourages more rhizome buds, speeding up their spread.
Should Coreopsis Plants Be Spaced Far Apart to Reduce Spreading?
Planting coreopsis with proper spacing limits their spread effectively. Giving them 18-24 inches apart helps control growth without stunting bloom.
Is Coreopsis More Likely to Spread in Full Sun or Shade?
Coreopsis spreads fastest in full sun, more than six hours daily. Sunlight fuels photosynthesis, boosting both seed and rhizome growth rates.
Key Points to Remember
Coreopsis plants spread mainly by seeds and clump division. You can control their growth by picking the right species. Space them carefully in your garden.
Remove flowers before seeds fall to manage spread. Start with one action now, like deadheading, to keep your garden looking great.