How Do Worms Breed: A Complete Guide for Fast, Healthy Worm Reproduction
How do worms breed? Worms reproduce by mating and producing cocoons that hatch baby worms. The cocoons contain several baby worms.
They hatch in a few weeks. Temperature and moisture affect how fast they hatch. Red wigglers are common compost worms.
They can double their numbers in 2 to 3 months. Good conditions are needed for this growth.
Worms prefer dark, moist places with temperatures between 59 and 77 degrees Fahrenheit. They create multiple cocoons weekly for many months once mature. This steady cocoon production helps their population grow quickly under the right care.
Start breeding worms by setting up a moist, shady environment with enough organic food. Keep the bedding damp but not soaked to give cocoons the best chance to hatch. Keeping the temperature stable is also key to healthy worm reproduction for composting.
Key Takeaways
- Maintain bedding moisture to about as damp as a wrung-out sponge.
- Keep temperature between 59°F and 77°F for optimal worm breeding.
- Feed worms regularly with vegetable scraps but avoid acidic foods.
- Provide dark and well-aerated bedding to encourage worm activity.
- Look for small, lemon-shaped cocoons as signs of worm reproduction.
- Expect cocoons to hatch in about 3 to 4 weeks under good conditions.
How Do Worms Reproduce? The Mating and Cocoon Process

Worms reproduce sexually, meaning two worms must mate to start the process. Each worm has male and female reproductive organs, making them hermaphrodites.
But they still need a partner to exchange sperm. When they mate, the worms line up ventrally and exchange sperm with each other.
The clitellum, a thick band around the worm’s body, plays a key role during mating. This part secretes mucus that helps the two worms stick together while they swap sperm. After they separate, the clitellum produces a mucus ring that slides forward along the body.
This mucus ring collects eggs from the worm and sperm stored from their mate. As the ring moves off the worm’s body, it closes into a protective cocoon. Fertilization happens inside this cocoon, where the eggs and sperm combine safely.
The cocoon protects developing baby worms for 10 to 20 days until they hatch. Each cocoon holds 2 to 15 young worms.
Composting worms like red wigglers usually have 2 or 3. Worms can produce multiple cocoons per week if conditions are right.
Worms start making cocoons after they become adults. This happens around 6 to 12 months old. The clitellum must be fully developed first.
Red wigglers reproduce every 60 to 90 days. They usually make 2 or 3 cocoons weekly.
This continues for several months. This steady cocoon production keeps new generations coming.
The whole process depends on healthy worms and stable conditions, like the right moisture and temperature. Without a mate nearby, worms cannot fertilize their eggs and won’t reproduce.
Cocoons that form without sperm will not develop. So you need at least two adult worms to keep breeding going.
The Worm Life Cycle: From Egg to Mature Adult
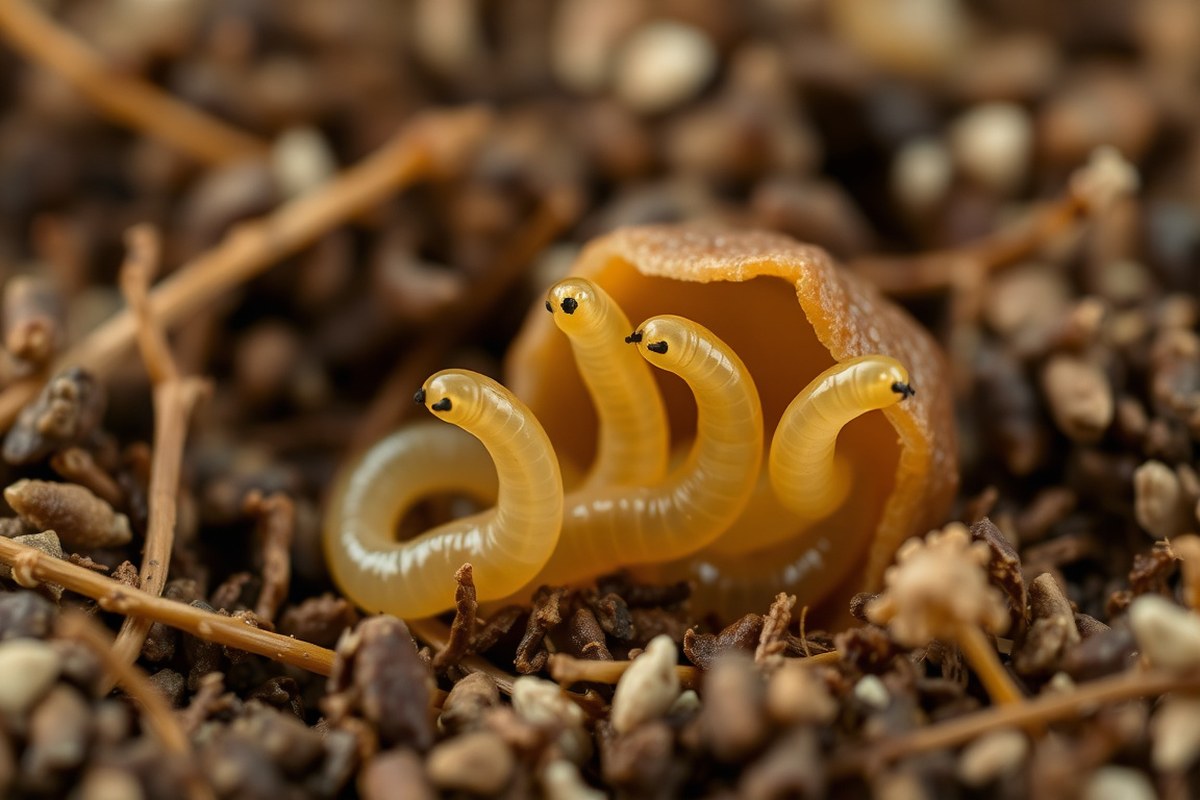
Worms go through four main stages: egg, hatchling, juvenile, and adult. Cocoons generally take three weeks to five months to hatch, depending on conditions. Worms reach breeding age in about 60 to 90 days.
Egg Stage and Cocoon Formation
Worms create small cocoons to hold their eggs. Each cocoon is about the size of a grain of rice.
Inside this cocoon, eggs develop until they’re ready to hatch. The cocoon’s color changes to a reddish cast when baby worms are about to emerge.
Warm temperatures speed up hatching. At 59, 77°F (15, 25°C), cocoons hatch in about one month.
But cooler or dry conditions slow the process. Each cocoon can release between 2 and 20 baby worms.
Hatchling and Juvenile Development
When they first hatch, baby worms are small, about half an inch long, and translucent white. They look like little versions of adult worms but lack mature reproductive organs. These young worms are called juveniles as they grow toward adulthood.
Juvenile worms continue to grow over two to three months. During this time, they develop reproductive organs and gain the ability to breed. Moist, warm soil helps them grow faster and healthier.
Adult Worm and Reproductive Maturity
Adult worms show a visible clitellum, a thick band near their heads, signaling they can reproduce. It usually takes about 60 to 90 days from hatching to reach this stage. At maturity, worms start the cycle over by finding mates and laying cocoons.
Adult worms stay active in moist environments between 46°F and 50°F, which supports steady reproduction. Under ideal care, your worm population will grow quickly as adults continuously produce cocoons.
Keep your worm bedding moist but not soggy to prevent cocoons from drying out or rotting.
Environmental Factors That Affect Worm Reproduction
Worms breed best when their environment hits the right balance of temperature, moisture, diet, and crowding. Keep your worm bin between 55°F and 77°F. This range is warm enough for worm activity.
Avoid temperatures that cause stress. Outside this range, worms either slow down or stop breeding.
Keeping the bedding like a damp sponge, about 60 to 80% moisture, is key. Too dry, and the worms suffocate; too wet, and they can drown. Proper moisture helps cocoons hatch successfully after 21 to 28 days.
Their diet affects how many cocoons they produce. Feed worms a mix of fruit scraps, vegetable peels, and crushed eggshells. This variety gives them energy.
It helps them multiply faster. Just cardboard or plain leaves keep them alive but don’t boost reproduction very much.
Density also matters a lot. Worms need enough room to avoid crowding.
Too many worms means high stress and competition, which slows breeding. But having too few worms means less chance for reproduction.
| Factor | Ideal Condition | Effect of Deficiency/Excess | Breeding Impact |
|---|---|---|---|
| Moisture | Damp Sponge (60-80%) | Too dry = suffocation; too wet = drowning | High → Low |
| Temperature | 55°F to 77°F | Too cold = dormancy; too hot = stress | High → Low |
| Diet | Diverse organic matter | Monotonous diet = low energy | Moderate → High |
| Density | Balanced space | Overcrowding = stress and competition | High → Low |
You need to check moisture regularly and add fresh scraps every few days. Keeping these conditions is important. It takes some effort.
Do a simple squeeze test on the bedding. It should feel like a damp sponge. Avoid it being too wet or too dry.
You’ll see steady cocoon production with hatching in three to four weeks. That means your worms are doing well. Temperatures above 77°F or soggy bedding reduce baby worm numbers.
Keep the environment just right to avoid this. Adjust moisture, reduce crowding, or add better food to boost reproduction.
Differences in Reproduction Among Worm Species
Two main worms used in vermiculture are red wigglers and European nightcrawlers. They both reproduce sexually, requiring mates to produce offspring. Their breeding strategies and cocoon outputs differ, which affects how quickly they grow their populations.
Red wigglers reproduce fast. They lay cocoons frequently, often producing new batches every 60 to 90 days.
This rapid breeding helps red wigglers quickly colonize fresh organic matter on the surface. European nightcrawlers breed more slowly and lay cocoons less often.
| Feature | Red Wigglers | Nightcrawlers |
|---|---|---|
| Breeding Strategy | Rapid Expansion (r-strategists) | Slow & Steady (K-strategists) |
| Cocoon Frequency | High / Frequent | Low / Occasional |
| Growth Rate | Exponential | Linear / Slow |
| Primary Habitat | Surface Organic Matter | Deep Soil Verticals |
| Population Goal | Quickly colonize new food sources | Maintain stable soil ecosystems |
The preference for habitat impacts their reproduction. Red wigglers thrive in decomposing materials on the surface.
Nightcrawlers prefer deeper soil layers with less fluctuating temperatures. This difference means you choose them depending on your compost setup and goals.
You can expect red wigglers to multiply faster with the right moisture. Keep their environment between 55°F and 77°F. These conditions help them grow best.
Nightcrawlers will reproduce slower but are hardier in cooler or mixed conditions. Pick the species that suits your climate and compost style.
How to Breed Worms Successfully: Practical Steps and Setup Tips
Setting Up Your Worm Breeding Environment
Start with a container about 10 to 20 gallons in size. Drill small holes for airflow and drainage to avoid soggy bedding. Use shredded cardboard or newspaper for bedding.
Make 3 to 4 inches thick bedding. It holds moisture and provides carbon nutrients.
Keep the bedding damp like a wrung-out sponge. This moisture level helps worms breathe and move easily. Avoid soaking or drying out the bedding because both harm worm health.
How to Start and Grow Your Worm Population
Begin with about 25 healthy red wigglers or compost worms. Spread them evenly over the bedding and cover with a small layer of bedding material. Worms adapt quickly and begin breeding soon after settling in.
Feed your worms small amounts of food scraps every 3 to 4 days. This keeps a steady food supply without overwhelming the bin. Use fruit and vegetable scraps, crushed eggshells, and coffee grounds.
Feeding Frequency and What to Feed
Feed worms regularly to fuel reproduction. Provide about half a pound of food per 1000 worms weekly. Overfeeding leads to bad smells and pests, while underfeeding slows breeding.
Chop food pieces into small bits so worms digest them faster. Avoid meat, dairy, and oily foods because they harm the worms and attract bugs. Fresh scraps promote faster cocoon production and more hatchlings.
Maintaining and Replacing Bedding
Check bedding moisture and texture weekly. Add dry shredded cardboard if too wet or mist water if dry. Replace or refresh bedding every 6 months to avoid compacting or harmful build-ups.
When replacing, move mature worms and some bedding to the new bin. This helps retain microorganisms beneficial for worm health. Healthy bedding supports better breeding and faster worm growth.
Step-by-Step Worm Breeding Checklist
Follow these steps for a strong worm colony and fast reproduction:
- Choose a plastic or wooden container with drainage holes.
- Fill with 3 to 4 inches of damp shredded newspaper or cardboard.
- Add 25 compost or red wiggler worms evenly across bedding.
- Feed small amounts of chopped fruit and vegetable scraps every 3 to 4 days.
- Check bedding moisture weekly, keeping it sponge-damp.
- Turn bedding gently to avoid compacting once a month.
- Replace or refresh bedding every 6 months, transferring mature worms.
Keep bedding damp but not soggy to avoid worm stress and slow breeding.
Common Mistakes in Worm Breeding and How to Fix Them
Low cocoon production often happens because the environment is wrong for worms. Too dry or too wet bedding keeps worms from breeding. Check moisture by squeezing a handful of bedding.
It should feel like a wrung-out sponge. Add water or dry bedding to fix moisture problems slowly, over days.
Overfeeding causes leftover food to rot and smells bad. It can also draw pests and stress worms. Start by feeding small amounts, about a half cup per pound of worms each week.
Remove uneaten scraps after five days to keep the bin healthy. Underfeeding slows reproduction since worms lack energy to make cocoons. Watch worm behavior to see if they actively eat their food.
Worms may stop breeding if the bedding temperature is too high or low. Ideal temperatures range between 55°F and 77°F (13°C to 25°C). Keep the bin out of direct sun and cold drafts.
If breeding stops, test temperature and adjust its location. You can add insulation like straw or move the bin indoors during extreme weather.
Maintaining a healthy population means keeping bedding fresh and balanced. Old bedding turns compact and loses air, which stresses worms and slows breeding.
Change about 25% of bedding every two to three months to avoid this. Also, avoid strong chemicals like bleach or pest sprays near your bin.
- Keep bedding moist but not soggy, like a wrung-out sponge.
- Feed worms small food amounts and remove leftovers after five days.
- Maintain temperatures between 55°F and 77°F to boost breeding.
- Change 25% of bedding every two to three months to improve air flow.
- Avoid chemicals and harmful sprays near the worm bin.
Watch your worms regularly to notice any drop in activity or breeding signs. Fix problems quickly to avoid population loss. Healthy worms keep your compost rich and multiply faster, giving you more worms within months.
Unusual Worm Reproduction Methods: Parthenogenesis and Regeneration
Worms mostly need a mate to reproduce, but some species show rare exceptions. Parthenogenesis is a type of asexual reproduction where a female worm produces offspring without fertilization. This happens in a few worm species but not in common earthworms kept in vermiculture bins.
Parthenogenesis lets worms create clones of themselves. It skips the mating and cocoon stages typical in earthworms. This method saves energy but lowers genetic diversity in the population.
Limited diversity makes worms less able to fight diseases or adapt to changes. This could harm the worm community’s long-term survival.
Another common myth is that worms can regenerate into new individuals by simply breaking apart. Some worms can grow back lost segments. That does not mean one piece grows into a full worm.
Each part alone can’t become a whole worm. Most earthworms need to stay intact to grow fully again. So splitting them won’t create new worms.
Certain marine and flatworm species reproduce through fragmentation, where body parts develop into new worms. This is different from most soil worms you handle in compost bins. These flatworms can bud or split naturally, producing new worms without a mate.
Earthworms you use for compost still need to mate and exchange sperm to produce cocoons. Stress like too much disturbance or poor temperature can disrupt their breeding cycles. Keeping conditions steady allows normal reproduction without needing to rely on rare asexual methods.
Understanding these differences helps you avoid wrong attempts like slicing worms to breed them. Focus on good bin care instead, since sexual reproduction remains the primary way earthworms multiply.
Some species do use parthenogenesis or regeneration. But these are exceptions found mainly outside typical vermiculture environments.
Signs Your Worms Are Successfully Breeding
You can tell your worms are breeding by spotting cocoons, baby worms, and a bigger population. These signs come in stages, usually over six weeks. Watching closely helps you know if your setup supports healthy worm breeding.
Identifying Worm Cocoons
Look for tiny, lemon-shaped cocoons in the bedding. They usually measure 1 to 3 millimeters and range from yellow to orange or brown. These cocoons hold the worm eggs and appear a bit firm compared to the soft bedding.
You might find these cocoons tucked in damp spots or under bedding scraps. They can be hidden but shine under natural or indirect light. Spotting them early shows your worms are mating and laying eggs.
- Check bedding every 1 to 2 weeks for small yellow-orange capsules
- Use a magnifying glass to see tiny cocoons clearly
- Look especially near moist bedding layers and worm clusters
- Handle bedding gently to avoid damaging cocoons
- Note cocoons appear within 2 weeks after worms mate
- Cocoons change color as embryos develop, turning darker
- Remove too many cocoons carefully to avoid disrupting growth
Too dry or too wet bedding hides or kills cocoons, keep moisture balanced.
Regularly checking cocoons tells you if reproduction has started. Without cocoons, worms may not be mating well or the bedding conditions are off.
Recognizing Baby Worms
New baby worms look like tiny, thin copies of adults. They’re whitish and almost see-through, which makes spotting them tricky. They stay hidden in bedding and usually appear 3 to 4 weeks after cocoons form.
Baby worms are about 1/8 inch long when they hatch and grow fast. They begin to darken as they eat and move around the bin more actively. Watching closely helps you catch these early signs of a growing population.
Handle bedding gently to avoid harming these fragile young worms. They don’t look like mature red wigglers yet. Their worm shape is clear already.
Monitoring Population Growth
Worm populations grow noticeably around 4 to 6 weeks after cocoons appear. Look for more worm activity and increased numbers while sorting bedding. More worms mean your system is healthy and breeding is successful.
Check your bin’s volume regularly for signs like thicker worm layers or more castings (worm poop). A healthy population doubles in about six weeks under good conditions. This growth means more worms to compost effectively.
- Count worm numbers every 3 weeks during bedding inspection
- Measure worm castings increase as a sign of worm activity
- Note faster composting times, which indicate more worms
- Watch for healthy worm size and color in all age groups
- Maintain proper bedding moisture (around 70%) for steady growth
A sudden drop in worm numbers could signal poor bedding conditions or overcrowding.
Keeping track of population helps you know when to expand or harvest worm bedding. Rapid growth points to good reproduction and setup health.
Step-by-Step Action Plan to Start Breeding Worms
Use this plan to create the right conditions and track your worms’ progress. Follow each step carefully for steady breeding results.
- Before You Begin: Set up a worm bin with loose, moist bedding. Check that temperature stays between 55°F and 77°F to promote breeding.
- Day 3: Add a handful of shredded fruit and vegetable scraps. Look for worms to gather and begin feeding actively.
- Week 1: Keep bedding damp, but not wet. Squeeze a handful to check that only a few drops come out.
- Week 2: Inspect bedding for small, lemon-shaped cocoons. Their presence shows worms are mating and laying eggs.
- Week 4: Notice tiny worm hatchlings near the cocoons. Seeing baby worms means your setup supports reproduction.
- Weeks 4-8: Feed regularly, avoid overfeeding. Remove uneaten food to prevent mold, which stops breeding.
- After 8 Weeks: Harvest mature worms for use or increase bin size for population growth. Healthy mature worms show your success.
Frequently Asked Questions
How Quickly Do Red Wigglers Produce Cocoons?
Red wigglers can produce 2 or 3 cocoons weekly for 6 to 12 months. This means one worm can create nearly 100 babies in half a year under good conditions.
Can Worms Breed Without a Mate?
Some worms can reproduce without mates through parthenogenesis, but it’s rare. Most compost worms breed by mating and need partners.
How Long Before Worm Cocoons Hatch?
Worm cocoons usually hatch in 2 to 4 weeks but can vary with temperature and moisture. Cooler or drier conditions slow hatching times significantly.
How Do Temperature Changes Affect Worm Breeding?
Temperatures between 59°F and 77°F suit compost worms best for breeding. Outside this range, breeding slows or stops, and cocoons may not hatch.
What Food Speeds Up Worm Reproduction?
Feeding worms organic kitchen scraps ensures steady reproduction rates. Avoid overfeeding, which can cause bad smells and harm their health.
Do Worms Regenerate Lost Segments During Breeding?
Worm regeneration of lost parts happens, but it doesn’t relate to their breeding fertility. It helps survival, not reproduction or cocoon production.
Wrapping Up
Worms reproduce by mating and laying cocoons that hatch into baby worms. Keeping your worm bin moist and warm helps them breed well. Start by setting up a good bin for your worms.
Watch closely for tiny cocoons. Cocoons mean your worms are healthy and reproducing.