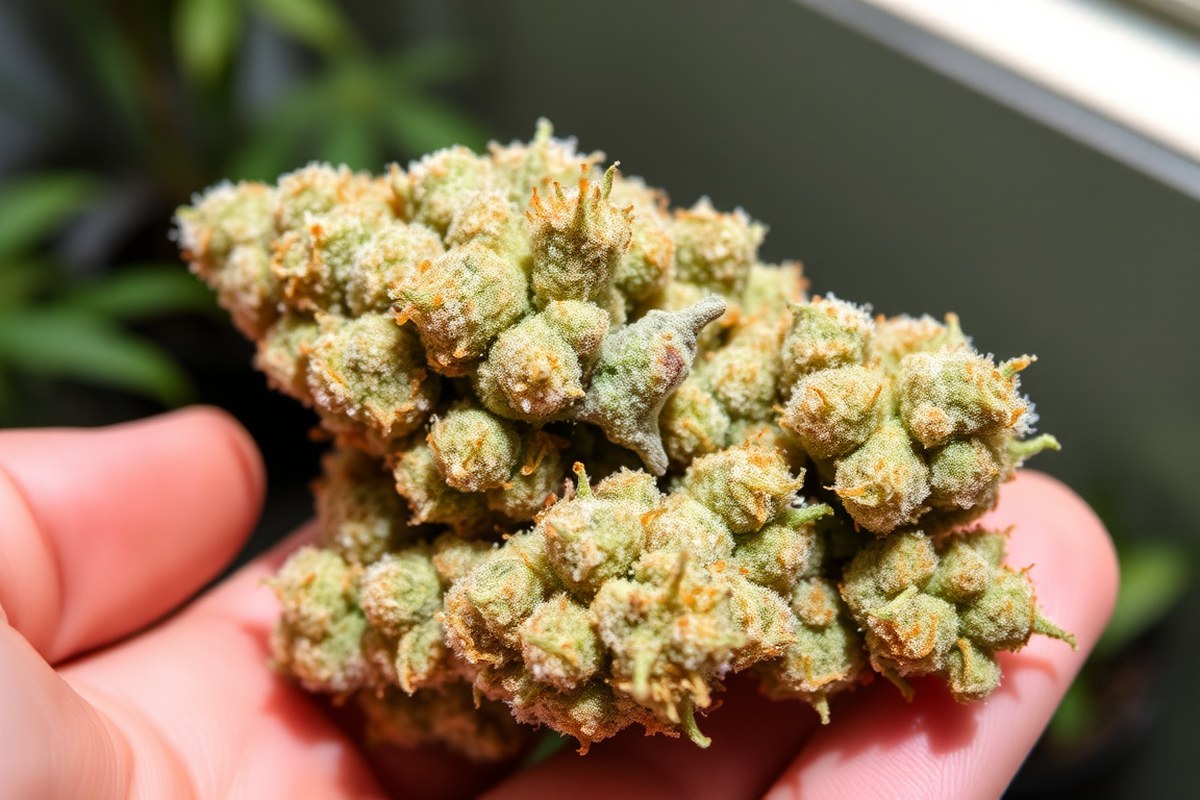
When to Harvest Buds: 8 Key Signs to Pick at Peak Potency
Knowing when to harvest buds is key to getting peak potency. The best moment comes when most trichomes turn milky white with some amber. This stage gives you top THC and CBD levels, plus great flavor and aroma.
Start by checking trichomes closely with a magnifier. Watch for 80-90% cloudy heads, it means the plant has reached its prime. Waiting too long could drop potency or change the effect.
Also watch pistils: About 90% darkened and curled pistils signal harvest time. Tracking these signs ensures you pick buds that deliver the effects you want.
Keep in mind harvest timing also affects bud density and moisture. Harvesting too early yields lighter buds, while waiting can increase resin production. Proper timing balances potency, flavor, and smoking experience to meet your goals.
Key Takeaways
- Harvest when 80-90% of trichomes are cloudy with 5-10% amber for peak potency.
- Use a magnifier to closely inspect trichomes and avoid guessing harvest time.
- Look for 90-100% of pistils darkened and curled as a harvest readiness sign.
- Harvest earlier with 70-90% darkened pistils for a more energetic, uplifting high.
- Wait for more amber trichomes if you want a sedative, relaxing effect.
- Start flushing plants 7-14 days before harvest by using only plain water.
1. How to Identify When Buds Are Ready to Harvest

Look for pistils as an initial sign your buds might be ready to harvest. When 70 to 90 percent of pistils turn dark, check closely. The pistils also curl in as they change color.
That signals it’s time to start watching your plant carefully. Pistils signal the flower is maturing. But this sign alone isn’t enough for exact timing.
Trichomes give the best clues about harvest readiness. These tiny crystals on buds shift from clear to cloudy, then amber. When 80 to 90 percent of trichomes look cloudy, buds peak in potency.
They have the highest THC and CBD then. That’s the best time for harvesting your buds. A mix with about 20 percent amber trichomes often means the best balance of effects.
Besides pistils and trichomes, watch the overall plant appearance. Leaves often yellow as nutrient uptake slows near harvest. Buds get plump and sticky, with larger bracts.
Plants may look less vibrant but stay healthy. Leaves browning or plant stress means harvest soon.
Waiting longer risks losing potency or inviting mold. Plan to cut your plants quickly in these cases.
Harvest windows usually open around the end of the flowering period, varying by strain type. Autoflowers often have tighter windows as they mature quickly. Indica-leaning plants tend to finish earlier.
Sativa-leaning ones need more patience with new growth continuing. Uniform plants often come down all at once. But top-to-bottom maturing plants might need staged harvesting.
Start trimming when most pistils are dark and curled in. Then check trichomes with a magnifier to confirm timing. This two-step method helps pick the right harvest moment.
A 60x to 100x jeweler’s loupe or microscope works well. Remember, pistils are an early alert, but trichomes tell you exactly when to harvest. Ignoring trichomes can lead to cutting too early or too late.
Once your harvest window opens, check daily for about two weeks. Potency usually stays peak during this time before dropping off. Don’t wait too long to harvest then.
More amber trichomes mean the effects will get more sedative. Expect your buds to feel less energetic and more relaxing. Watch trichomes to time the desired effect.
Watch for signs the plant is dying, like heavy leaf loss or mold risk. Harvest immediately in that case, even if trichomes aren’t ideal.
2. Understanding Trichomes: The Gold Standard for Harvest Timing
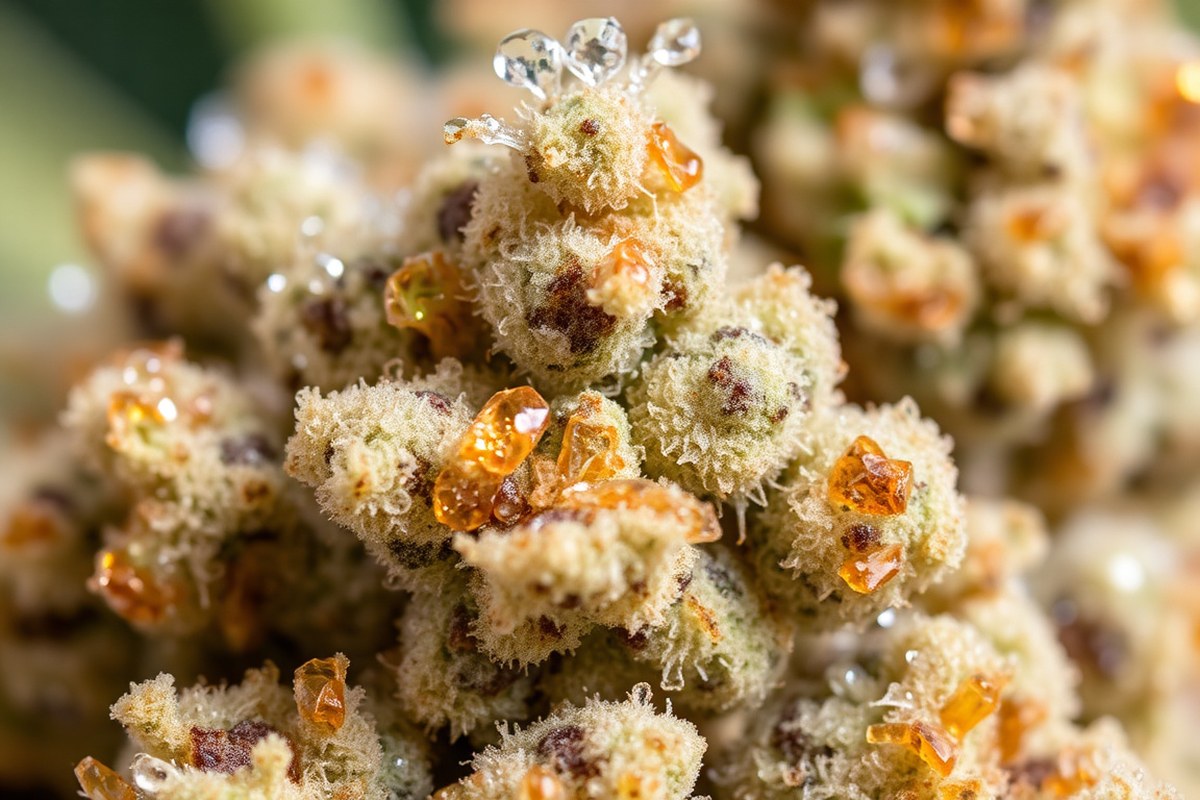
Trichomes are tiny, crystal-like glands on cannabis buds that hold cannabinoids and terpenes. They change color as the plant matures, giving you clear signs of when to harvest. Using a magnifier helps you spot these changes more clearly.
This lets you pick the right time to harvest. The best time depends on the effects you want.
What Clear Trichomes Mean
Clear trichomes are mostly precursor compounds that haven’t fully developed THC or CBD. At this stage, your buds will produce a weak and thin effect if harvested. Wait until fewer than 10% to 15% of trichomes are clear.
This shows most have changed color. Then it’s time to cut your plants.
Early harvesting often leaves too many clear trichomes, resulting in lower quality buds. These trichomes look shiny and transparent under a loupe, sometimes hard to see at first.
When Most Trichomes Become Cloudy
Cloudy or milky trichomes mean peak THC and CBD levels. This is when the buds are strongest and give you a more energetic and uplifting effect. The target is about 80% to 90% cloudy trichomes for the best potency.
Check the trichomes on the sugar leaves and calyxes. These should look mostly white and foggy, not clear or amber. Harvesting now maximizes psychoactive effects.
Amber Trichomes and Sedative Effects
Amber or gold trichomes show THC is oxidizing into CBN, which causes heavier, sedative results. About 5% to 10% amber trichomes is ideal for a more relaxing body high. Past 20%, you start losing potency as THC degrades.
Waiting longer shifts the high toward couch-lock and can make your buds less energetic. Watch for darker amber tones that signal the end of harvest timing. Use these steps to inspect trichomes closely and find the perfect harvest window:
- Get a quality 30x to 60x magnifier or jeweler’s loupe.
- Choose a clean, well-lit area for a clear view.
- Hold a branch steady and zoom in on the sugar leaves near buds.
- Look for tiny mushroom-shaped trichome heads changing color from clear to cloudy to amber.
- Check various buds to confirm consistent trichome stages.
- Keep track of the percentage of each color: clear, cloudy, and amber.
- Note that calyx trichomes change slower than sugar leaf trichomes.
- Harvest when you see mostly cloudy trichomes with 5% to 10% amber.
| Trichome Color | Chemical Stage | Effect | Harvest Action |
|---|---|---|---|
| Clear | Precursor compounds | Weak, thin, low yield | Wait; under 10-15% clear preferred |
| Cloudy (Milky) | Peak THC and CBD | Strongest, energetic high | Target 80-90% cloudy for harvest |
| Amber/Gold | THC converts to CBN | Heavier, sedating body high | Ideal 5-10%; over 20% loses potency |
Always clean your loupe after use and store it safely to avoid scratches and clearer viewing.
3. Using Pistil Color and Curling to Gauge Harvest Readiness
Pistils start white and turn dark as buds mature. Watch for 50-70% darkened pistils for an early harvest. This stage gives more cerebral effects but less peak potency.
When 70-90% of pistils have darkened and curled in, you’re in the best harvest window. Buds show peak THC levels with strong flavor and aroma.
Waiting until 90-100% pistil darkening ensures full maturity. But some effects may shift toward relaxation.
Pistil curling usually matches color change and signals ripening. Curled pistils look shriveled instead of straight and fresh. This turn adds confidence you’re close to harvest.
Strain differences affect pistil timing and color shade. Some strains darken quickly, others stay lighter longer.
Check lower buds away from direct light when you see mixed signs. These often reveal maturity better.
Use a magnifier to track pistil changes carefully. Note when 70-90% have darkened and curled for strong THC. Combined with milky trichomes, this points to harvest readiness.
When pistils remain mostly white, it’s too early to harvest. White pistils mean the flower hasn’t fully matured. Harvesting too soon lowers potency and bud density.
Darker pistils alone don’t guarantee ripeness; look for swelling calyxes too. These plump up as flowers mature, confirming it’s time. Watch your plant’s overall cues, not just pistils.
Tracking pistil color is simple and doesn’t need fancy tools. It’s handy when you can’t use a microscope. Follow the timeline from white to mostly dark and curled for a good harvest guide.
4. How Different Harvest Times Affect Potency and Effects
| Harvest Timing | THC Level | CBN Level | Aroma & Flavor | Type of High |
|---|---|---|---|---|
| Early | Lower, not fully developed | Minimal | Less complex, mild terpene profile | Clear, uplifting, less intense |
| Peak (about 90-100% dark pistils, mostly milky trichomes) | Highest THC content | Low | Rich, full aroma and flavor | Balanced, potent, euphoric high |
| Late (more amber trichomes) | Decreasing THC | Increasing CBN | Weaker aroma, sometimes harsher flavor | Sedative, relaxing, couch-lock effects |
Harvesting buds too early means THC and other cannabinoids haven’t fully developed. This causes weaker highs and less aroma. Early buds often feel more uplifting but lack potency and rich flavors.
Harvesting at peak ripeness maximizes THC and terpene content. Buds smell and taste their best with a fuller, complex flavor profile.
You get a strong, euphoric high that many growers aim for. Check trichomes; most should be milky with few amber ones to hit this sweet spot.
Harvesting too late leads to THC breaking down into CBN, a less psychoactive compound. This shift causes a more sedative, couch-lock effect.
The aroma and flavor fade, sometimes becoming harsh or dull. Most growers avoid late harvest unless they want stronger body effects.
Choosing your harvest time depends on the effects you want. For energetic, clear-headed highs, pick buds closer to peak or just before full maturity. For calming, sleep-friendly effects, wait until trichomes turn mostly amber, around 20, 30% amber trichome presence.
Terpene changes also affect taste and smell. Early harvest buds are fresher but mild.
Peak buds have the richest terpene profiles, including pine, citrus, or fruity notes. Late harvest buds lose much of this complexity, making flavor more muted or even earthy.
Use a magnifier to check trichomes on several buds, especially those with direct light. Tracking pistil color alongside trichomes helps too. Build a photo log each cycle to learn your strain’s timing.
This process only costs a small magnifier and some patience. It pays off with perfect harvests tailored to your taste. You get a high preference yield.
5. Timing Your Harvest Based on Strain and Plant Type
Harvest timing depends on whether your cannabis is indica, sativa, hybrid, or autoflower. Indica strains typically flower faster, about 7-9 weeks.
Sativas take longer, around 10-12 weeks. Hybrids sit between these ranges, adjusting based on their dominant traits.
Autoflower strains differ because they don’t rely on light cycles to flower. They usually finish in 8-11 weeks from seed regardless of lighting. This means you won’t wait for a light change to start checking buds for harvest readiness.
The buds on the same plant can mature at different rates. Check multiple bud sites before deciding to harvest.
Focus on main colas first, then lower branches that may still need time. It can take up to two weeks to harvest everything fully.
| Strain Type | Flowering Time | Harvest Start Cue |
|---|---|---|
| Indica | 7-9 weeks | Foxtails & 80% milky trichomes |
| Sativa | 10-12 weeks | Buds fully fattened, clear to milky trichomes |
| Hybrid | 8-11 weeks | Between indica and sativa cues |
| Autoflower | 8-11 weeks from seed | Bud fattening and trichome maturity |
During weeks 4-6 of flowering, buds grow quickly in size. This period is key to watch for fattening buds. You can start checking trichomes and pistils often at this point.
Don’t just look at time on a calendar. Plants show clear signs when they’re ready.
Buds turning foxtail or trichomes reaching 80% milky usually mean it’s time. Waiting longer might lower THC or change the high.
Watch for buds that get damaged or sick in late flowering. Harvest them early to save yields.
6. Preparing for Harvest: Flushing, Tools, and Pre-Harvest Steps
Flushing your cannabis plants with plain water for 7 to 14 days removes extra nutrients. Gather sharp scissors, pruning shears, gloves, and digital scales for a smooth harvest. Prepare a clean, well-lit area with space to hang your buds to dry.
How and When to Flush Plants
Flushing means watering your plants with only pH-balanced water, no nutrients. Do this 7 to 14 days before harvest to clear out leftover nutrients and improve taste.
Start flushing early to avoid nutrient buildup that makes smoke harsh or chemicaly. Over-flushing beyond two weeks can reduce your final flower weight. So stick to a week or two.
Plants grown in soil or coco need about 7 to 14 days of flushing. Hydroponic setups require fewer days, often just 3 to 5 days before harvest.
Essential Harvesting Tools
You need strong, sharp scissors or pruning shears to trim buds cleanly. Gloves protect your hands and keep buds free of dirt and oils during handling.
A magnifying glass or jeweler’s loupe helps check trichome maturity before cutting. Digital scales are handy for weighing your yield and tracking consistency.
Keep your tools clean by wiping blades with rubbing alcohol before and after use. This prevents contamination and keeps cuts smooth, reducing damage to buds.
Setting Up Your Harvest Area
Choose a cool, dark area that keeps the temperature around 60°F to 68°F (15°C to 20°C). Ensure there’s gentle airflow to prevent buds from drying out too fast. This helps maintain bud quality during drying.
Clear enough space to hang buds upside down without crowding. Use string or hangers placed so buds do not touch each other for even drying.
Arrange all your tools and containers before harvest starts. A clean, organized space helps you move efficiently and keep buds intact. Follow these steps to prep for a smooth harvest:
- Flush your plants with plain, pH-balanced water starting 7, 14 days before harvest.
- Clean and sharpen your pruning shears or scissors using rubbing alcohol.
- Gather gloves, magnifying glass, digital scales, and containers for trimmed buds.
- Clear a dark, cool room with good airflow and set up hanging lines or racks.
- Inspect trichomes on buds regularly during flushing using your magnifier.
- Wear gloves to prevent oils or dirt from transferring to buds.
- Keep your tools handy and organized to avoid delays once you start cutting.
7. Common Harvest Mistakes and How to Avoid Them
Harvesting too early leads to small, weak buds with less potency. Picking too late causes trichomes to turn gray and wither, weakening bud quality. Watching trichomes helps you catch the right harvest window for best results.
Drying cannabis poorly risks mold, especially bud rot from botrytis. Mold often shows as gray or brown fuzz on buds or inside the stems.
Keep humidity between 45% and 55% and temperatures around 60°F to 70°F to avoid mold. Ensure good airflow but avoid direct fans on buds, which can dry them too fast.
Trimming mistakes reduce both the look and smoke quality of buds. Cutting too aggressively wastes the flower’s good parts.
Leaving too many large leaves lowers your bud’s appearance and smoothness. Trim carefully using sharp scissors and remove any brown or damaged parts.
- Harvest at peak trichome maturity for strong, flavorful buds.
- Hang buds in a dark, cool, and well-ventilated room for 7, 14 days.
- Check daily for signs of mold and remove any affected buds immediately.
- Trim after drying using clean, sharp scissors to avoid bruising buds.
- Store trimmed buds in airtight jars and open them daily during the first two weeks.
- Avoid rushing drying as fast drying causes harsh smoke and dull flavor.
- Use a drying rack for smaller harvests to keep airflow even across buds.
Drying and trimming take patience but protect the work you did growing. When done right, buds stay smooth, sticky, and smelly like the best dispensary flowers. Mistakes in harvesting or trimming quickly show up in your final product’s taste and burn quality.
8. Drying and Curing Cannabis Buds for Optimal Quality
Dry your cannabis buds slowly at 60 to 70°F. Keep humidity between 50% and 55%. Use a controlled space for best results. Dry your buds for 7 to 10 days first.
After that, cure them in airtight jars. Let them cure for 2 to 4 weeks or more. Burp the jars every day during the first two weeks.
This balances moisture inside the jars. It helps keep flavor and potency strong.
Ideal Drying Environment
Drying cannabis too fast or slow damages flavor and potency. Keep the room temperature between 60°F and 70°F and humidity in the 50% to 55% range. Avoid direct sunlight and strong air currents to protect delicate trichomes.
Use a hygrometer to monitor humidity closely. Lower humidity stops mold but drying too fast makes buds brittle and harsh. A steady, well-ventilated room with indirect light works best for drying.
| Factor | Ideal Range |
|---|---|
| Temperature | 60, 70°F (15, 21°C) |
| Humidity | 50, 55% Relative Humidity (RH) |
| Light | Dark or low indirect light |
| Airflow | Gentle ventilation, no strong winds |
Curing Duration and Process
Buds are ready for curing when the outside feels dry. The stems should snap instead of bending. This shows they have dried enough.
Place trimmed buds in airtight glass jars, filling them about 75% full. This leaves some air space to preserve quality and stop mold.
Cure buds for at least 2 weeks to improve flavor, smoothness, and potency. Many growers extend curing to 4 weeks or longer.
Longer curing deepens taste and helps reduce harshness. Store jars in a cool, dark place during curing.
How to Burp Curing Jars Properly
Burping jars is key. Open the lids once a day for 10 to 15 minutes during the first two weeks.
This releases excess moisture and prevents mold formation inside the jars. After two weeks, burp less often, about twice a week.
Check buds for any signs of mold or over-drying every time you burp. When buds feel dry, burp the jars less often.
This helps keep moisture levels steady inside the jars. Using a digital hygrometer inside jars gives accurate humidity readings to guide you.
- Trim excess leaves from freshly harvested buds.
- Hang or lay buds in a dark, ventilated room at 60, 70°F and 50, 55% RH.
- Dry buds for 7 to 10 days until stems snap cleanly.
- Place dried buds in airtight jars, filling 75% full.
- Store jars in a cool, dark location for curing.
- Open jar lids daily for 10 to 15 minutes during first 14 days.
- Check buds for moisture and mold, adjust humidity if needed.
- After two weeks, burp jars twice weekly until curing is complete.
Keep air moving gently while drying your buds. Open jars daily during the first part of curing. This prevents mold and keeps potency intact.
Step-by-Step Action Plan for Harvesting Cannabis Buds
Follow these easy steps to harvest your buds at the right time. This helps you get the effects you want. Stick to these tips for the best results.
- Two weeks before harvest: Start flushing your plants with plain water. This removes leftover nutrients and improves taste.
- One week before harvest: Check trichomes daily using a magnifier. Wait for mostly cloudy with some amber for balanced potency.
- Three days before harvest: Watch pistils closely. When 70-90% have darkened and curled in, your buds are ripe.
- Day of harvest: Use sharp, clean tools to cut branches. Handle buds gently to avoid damage.
- After harvest, first 3 days of drying: Hang buds in a dark, ventilated room at 60-70°F. Check daily until stems snap.
- First week of curing: Place dried buds in airtight jars. Open jars once a day for 10-15 minutes to release moisture.
- Weeks 2 to 4 of curing: Open jars less often. This deepens flavor and smooths effects.
- Beyond 4 weeks: Store buds in a cool, dark place. Proper curing gives best potency and taste.
Frequently Asked Questions
How Long Do I Have to Harvest After Trichomes Turn Cloudy?
You usually have about two weeks after trichomes turn cloudy to harvest. After this window, buds can lose potency and degrade in quality. Monitor daily to catch the perfect time.
Can I Harvest Parts of My Plant at Different Times?
Yes, you can do a progressive harvest if some buds mature earlier. This lets you pick the ripest buds first and let others develop longer for varied effects. It works well for uneven mature plants.
What Does It Mean If Pistils Stay White and Straight?
White, straight pistils mean the buds aren’t ready to harvest yet. The plant is still maturing and hasn’t shifted energy fully into bud development. You need to wait until more pistils darken and curl.
Is It Better to Cut the Whole Plant or Individual Buds?
Hanging the whole plant is common if harvesting all at once. It’s easier and lets buds dry evenly. But pick only some buds, not the whole plant.
Cut those buds carefully. Dry them apart for the best results.
How Does Plant Type Affect the Harvest Window Length?
Autoflowers usually have a shorter, tighter harvest window. Photoperiod indica types finish quicker than sativas, which need more patience. Knowing your strain’s type helps you plan when to check buds closely.
When Should I Start Flushing Before Harvest?
Start flushing your plants about 1 to 2 weeks before harvest. Flushing clears out leftover nutrients, improving taste and burn quality. Timing depends on your growing method but don’t flush too early.
Key Points to Remember
Harvesting your buds at the right time changes their quality and effects. Keep a close eye on trichomes and pistils for the best timing. Start your flush and prepare your drying space today to set yourself up for success.