How to Plant Bulbs in Pots: A Complete Guide for Beautiful Blooms
Knowing how to plant bulbs in pots means you can enjoy blooms anywhere. Start with a pot at least 30 cm wide and deep to give roots room. Plant five to seven bulbs close together.
Space them about 1 to 2 cm apart. Keep them shallower than usual garden bed depth.
Choose bulbs suited for containers and chill them if needed before planting. Make sure your pot has drainage holes to avoid soggy soil. Early fall is the best time to plant when nights cool to 40-50°F.
Keep pots cool but above freezing for at least 10 weeks to help bulbs grow strong. After chilling, move pots to a brighter spot to encourage flowering. Watch soil moisture and don’t let it dry out or get waterlogged.
Key Takeaways
- Use a pot at least 30 cm wide and deep with drainage holes.
- Plant bulbs at a shallow depth with 1, 2 cm spacing between each.
- Chill bulbs 10 to 16 weeks at 4°C before planting if needed.
- Plant bulbs when nighttime temperatures drop to 40-50°F (4-13°C).
- Keep pots in a cool spot during winter but protect from hard freezes.
- Move pots to bright, indirect light after the chilling period.
How to Plant Bulbs in Pots: Step-by-Step Instructions
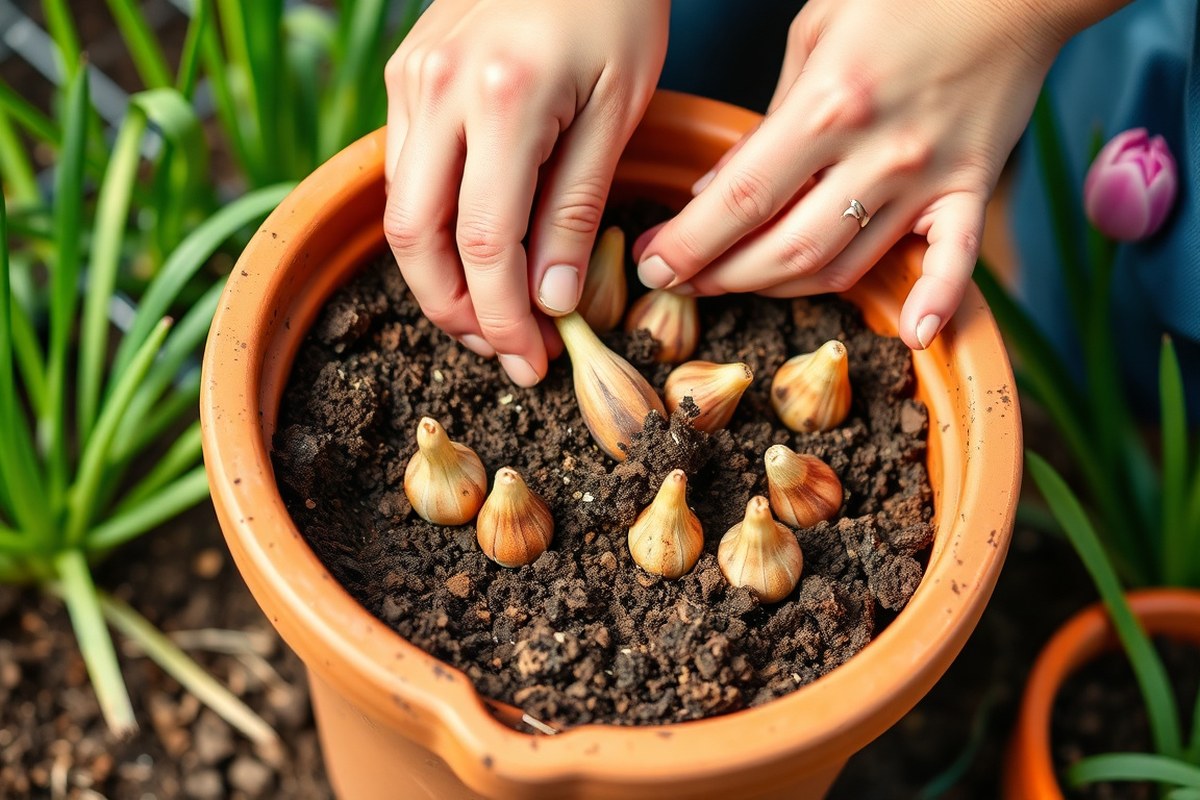
Planting bulbs in pots needs some planning. It is easy once you know how. Just follow a few simple steps.
Depth, spacing, and soil all matter to make your bulbs thrive. Use a pot deep enough for roots.
Plant bulbs about three times their height deep. Sometimes shallower works better in containers.
Use moist, humus-rich, loam-based potting soil for planting. Don’t mix bulbs with different needs in one pot. They need similar light and water.
Keeping them separate works best. Plant bulbs when soil cools to 40-50°F. This is early autumn for most bulbs. Tulips usually go in by November.
- Pick a pot 30 to 40 cm deep with drainage holes. Add small rocks or gravel at the bottom. This helps water drain well.
- Fill the pot with potting soil. Plant bulbs about three times their height deep. For example, 15 cm for daffodils and 8-10 cm for crocus.
- Space bulbs 1 to 2 cm apart. This fills the pot well. It makes a fuller flower display.
- Plant the deepest bulbs at the bottom. Put shorter ones above them. Add soil layers between groups.
- Cover bulbs with soil firmly. Make sure they sit at the right depth. Avoid gaps or air pockets.
- Water the pot gently but thoroughly after planting to settle the soil and start root growth.
- Plant bulbs shallow for early blooms. Keep them 2 to 5 cm deep. Chill bulbs well before planting.
- Add mulch like straw over the soil. This protects bulbs outside in cold months. It keeps the pot warmer.
Choosing the Right Pot: Size, Material, and Drainage
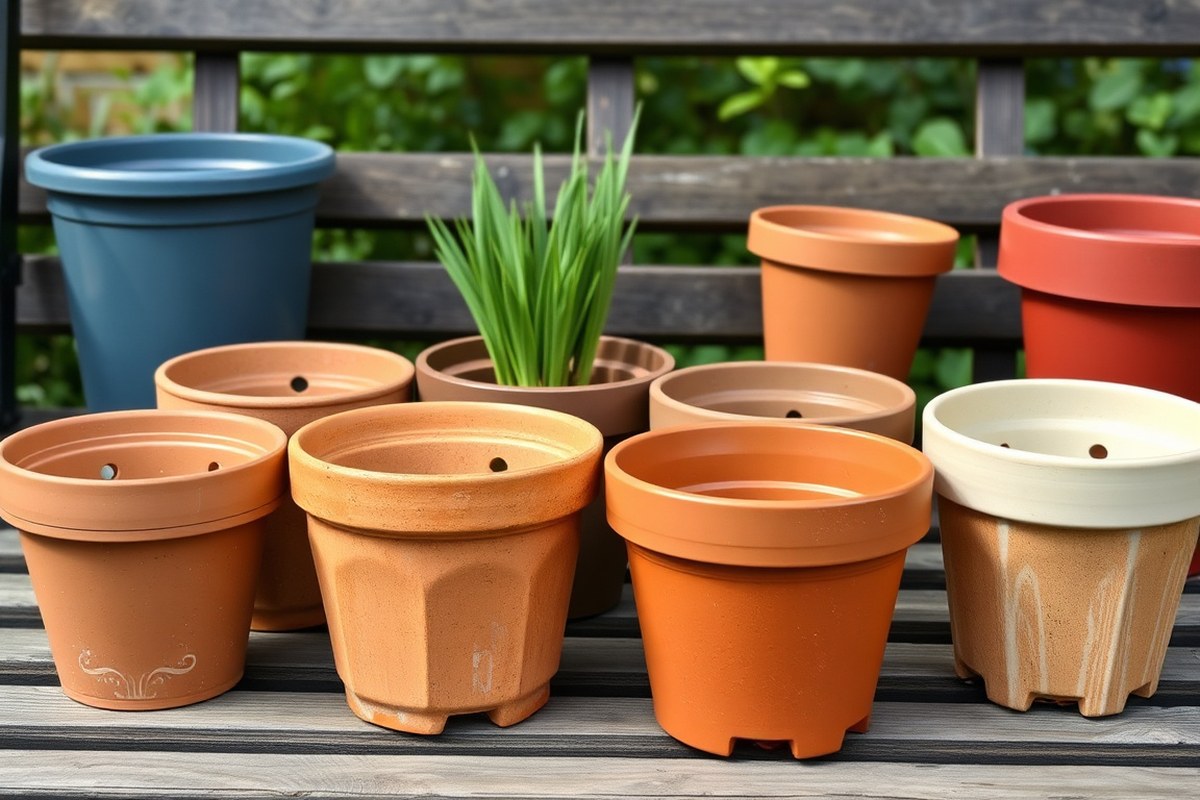
Your pot should be at least 25 to 30 cm (10 to 12 inches) deep. Bulbs need room for roots and soil. A pot this size holds enough soil to keep bulbs moist but not soggy.
Drainage holes are critical. They stop water from pooling at the pot bottom.
Bulbs don’t like sitting in wet soil. Waterlogged soil causes bulbs to rot and fail to grow.
Look for several drainage holes or drill your own if needed. Placing a layer of gravel or broken pottery under the soil helps water flow out faster.
| Pot Material | Benefits | Drawbacks |
|---|---|---|
| Terracotta/Clay | “Breathes,” helps soil dry well, avoids overwatering issues | Can dry out faster in hot weather, may crack in freezing temperatures |
| Plastic | Holds moisture longer, lightweight, cheaper | Less air circulation, risk of waterlogging if drainage holes are small |
| Glazed Ceramic | Decorative, retains moisture well | Can be heavy, may have limited drainage unless holes are added |
Choosing the right pot material depends on your environment and watering habits. Terracotta or unglazed clay pots help bulbs by letting soil dry between waterings. However, they can dry out fast in sunny spots or freeze during winter.
Plastic pots are budget-friendly and hold moisture longer. Use them if you forget to water sometimes. Just be sure they drain well to prevent standing water.
Check the pot base for holes before you fill it. Storing bulbs in pots during winter? Pick a lighter plastic pot.
It won’t crack outside. For spring blooms, decorative pots add a fresh look but must drain well.
Always test drainage before planting. Pour water in and ensure it flows quickly out.
Pick pot size based on the bulbs you want to grow. Think about your climate, too. It affects your choice.
Deep pots with drainage are your first priority. The pot’s material controls moisture levels for your bulbs.
Too wet or dry hurts growth. It can damage roots.
Best Bulbs for Containers and Their Planting Times
Many bulbs grow well in containers, but some are better suited for pots. Tulips, daffodils, crocus, lilies, and dahlias are popular choices for container gardening. Each bulb type has a best time to plant.
This depends on if it blooms in spring or summer. Planting at the right time helps flowers grow well.
Spring-flowering bulbs like tulips and daffodils are usually planted in fall. Bulbs need cold periods to make flowers. Pots can give this if kept somewhere cool.
Keeping bulbs chilled helps them bloom properly. Summer-growing bulbs such as lilies and dahlias go into containers in spring, after the last frost.
Warmer climates (zones 8 to 10) may need special bulbs that tolerate milder winters. Some bulbs in these zones don’t get enough cold naturally. So you must chill them in a fridge before planting.
Plant bulbs about three times their height deep in the pot. Some, like crocus, can be planted near the surface. Mixing bulbs with overlapping bloom times works well.
It fills your container with many flowers at once. This creates a great, full look.
| Bulb Type | Planting Time | Best Climate | Bloom Season |
|---|---|---|---|
| Tulips | Fall | Cool to moderate, zones 3-7 | Spring |
| Daffodils | Fall | Cool, zones 3-8 | Spring |
| Crocus | Fall | Cool to moderate, zones 3-8 | Early Spring |
| Lilies | Spring | Varies, best in zones 4-9 | Summer |
| Dahlias | Spring | Warmer, zones 8-10 | Summer to Fall |
Group pots with bulbs that bloom at different times for longer color displays. Smaller pots are easier to move to shelter during cold snaps. Terracotta pots look good with spring bulbs and help soil dry quickly so bulbs don’t rot.
In mild areas, bulbs don’t face freezing winters. People usually plant bulbs in pots when fall cools temperatures. This timing helps bulbs grow healthy roots.
In colder zones, plant bulbs after the soil has cooled. For a lasting bloom, rotate containers planted with different bulb types over the season.
How to Care for Bulbs in Pots Through Winter and Spring
Bulbs in pots need careful care to thrive through winter and spring. Water them moderately during growth and feed regularly after shoots appear. Protect bulbs from frost and pests to keep them safe and healthy.
Watering and Feeding Schedule
Keep the soil moist but not soggy during the cold and growing seasons. Stop watering when bulbs go dormant in cold spots to avoid rot. Once shoots are a few centimeters tall, water regularly and feed every 2-3 weeks.
Use a balanced liquid fertilizer to boost growth and flowering. Feeding encourages strong stems and vibrant blooms. Avoid overwatering, which can cause fungal problems and bulb decay.
Protecting Pots from Frost
Frost can damage bulbs and delay flowering, so protect pots during freezes. Move pots indoors or next to a house for warmth. If moving them isn’t possible, wrap pots with insulation materials.
Hessian fabric or bubble wrap around the pot sides blocks cold air and helps retain warmth. Choose a sheltered, well-ventilated location that stays cool but not freezing during winter. Avoid wet spots since damp cold increases frost damage risks.
- Move pots to a garage, shed, or basement for winter chill
- Wrap pots in breathable materials like burlap or bubble wrap
- Place pots close to building walls to block cold winds
- Keep pots off frozen ground using pallets or bricks
- Ensure good air flow to prevent mold or rot
Checking pots regularly during cold snaps will help you protect vulnerable bulbs. Early frost damage can stunt flowering or kill the bulbs entirely.
Pest Prevention for Potted Bulbs
Squirrels and rodents often dig up bulbs in pots. Use mesh wire or garden fleece to cover the soil surface. A snug-fitting cover stops pests from pulling out bulbs.
Vine weevils are another common threat. These pests eat bulb roots and leaves, leading to weak plants. Inspect foliage and soil often, especially in spring, for signs of damage.
- Check pot sides and soil for vine weevil larvae every week
- Apply nematodes to the soil if you spot larvae or adults
- Use wire mesh or netting to cover the pot top
- Remove fallen leaves and debris where pests hide
- Move pots to sunny, drier spots to discourage pests
Good pest control supports healthy bulbs and fuller blooms in spring. Early detection stops minor problems from becoming major issues.
Understanding Bulb Chilling and Forcing in Pots
Spring-blooming bulbs need a chilling period to start growing. Bulbs must have cold temperatures between 35°F and 48°F. They need this for 8 to 16 weeks. The exact time depends on the bulb type.
Without this cold time, bulbs won’t bloom well. They might only grow leaves without flowers. Proper chilling is needed for blooms.
Living in zones 7, 8, 9, or 10 means your outdoor temp may not get cold enough. You can pre-chill bulbs indoors by placing them in the fridge. Do not use the freezer.
Chill for 8 to 10 weeks. Pre-chilling bulbs indoors is popular to force them to bloom early. This is great for winter holiday flowers.
Place your bulbs in a container with soil or store them bare in paper bags. Store bulbs in a cool place like a basement or cold cellar. Use a second fridge if you live in cold zones such as 3 or 4.
Make sure the temperature stays steady between 35°F and 48°F for proper chilling. Avoid freezing temperatures that can harm bulbs.
The chilling period varies by bulb type: tulips typically need 12 to 16 weeks. Crocus and muscari require only 8 to 10 weeks. Plant bulbs in pots come fall and leave them outside to chill naturally.
This works if your climate is cold enough. For example, planting in October means you’d expect to force them indoors around February.
After chilling, move the pots indoors to a cool, bright place around 60°F for forcing blooms. This simulates spring and encourages the bulbs to flower. Keep the pots out of direct sunlight to prevent drying out.
Bulbs forced this way give you lovely indoor blooms. This works even with just a few bulbs in small pots.
Pre-chill bulbs in your fridge before planting when outdoor temps are too warm. Chill long enough to mimic natural cold.
What to Do with Bulbs After Flowering in Pots
After your bulbs finish flowering in pots, you need to take a few key steps. Remove dead flower heads and feed the bulbs to help them build energy for next year. Let the leaves die back all on their own.
Only then decide to store or replant the bulbs. This helps protect the bulbs for next season.
Deadheading and Feeding After Blooms
Cut off spent flowers as soon as they wilt. This stops the plant from wasting energy on seeds. It helps the bulb stay strong.
Feeding your bulbs after blooming helps refill their stored nutrients for a strong next cycle. Use a balanced liquid fertilizer or a bulb-specific feed according to package directions right after deadheading.
Feed once more every two weeks while the leaves remain green and healthy. Don’t remove flowers and leaves too soon; they are essential for energy storage. Neglecting to feed reduces the bulbs’ strength and bloom quality next spring.
Whether to Leave or Remove Leaves
Keep leaves on the bulbs until they turn yellow and dry up on their own. The fading leaves feed the bulbs with stored sugars before you remove them.
Pull off only yellow, dry leaves carefully. So you don’t damage the bulb or potting soil.
Water the pots lightly while waiting, enough to prevent the soil from drying out completely. Removing leaves too soon leads to weaker bulbs that may not flower well next time. Some bulb varieties tolerate leaving leaves longer, which increases their size through offsets called bulblets.
Storing or Replanting Used Bulbs
Wait for the leaves to die back fully. Then dig up bulbs and dry them. Keep them in a warm, well-ventilated place for a few days.
Remove any remaining foliage and old soil gently without washing the bulbs. Store them in paper bags or mesh sacks in a cool, dry, and well-ventilated spot.
You can replant bulbs in the garden during fall. This works if they survive outside through winter. It saves you from storing them.
For tender bulbs, keep them dry and cool to prevent rot or mold during winter. Leaving bulbs in pots works for hardy types.
Move the pots somewhere cool and dark. This keeps the bulbs safe through the off-season.
- Dry bulbs fully before storage
- Store in breathable containers, not plastic bags
- Keep storage temperature between 50°F and 60°F
- Avoid damp or airtight conditions to prevent rot
- Replant hardy bulbs outdoors in fall or early spring
- Water bulbs lightly until leaves yellow, then reduce
- Use fresh potting mix if replanting in pots next cycle
Common Problems and How to Fix Bulbs in Pots
Bulbs don’t flower for several common reasons. Too little sunlight, wrong planting depth, or poor-quality bulbs can stop blooms. Planting bulbs too late can cause weak or no flowers.
Using pots that hold too much water often harms root growth. Both problems reduce the chance of strong blooms.
Rot happens if the soil stays soggy. Bulbs need moist but well-drained soil. Using a pot without drainage holes or heavy garden soil increases rot risk.
Choose good peat-free compost and ensure pots drain well. Bulbs that feel soft or smell bad probably have rot. These bulbs should be thrown away to save the rest.
Vine weevil grubs are a problem in containers. They eat bulb roots and cause plants to weaken or die. These pests stay inside pot soil and can be hard to spot until damage shows.
Use nematode treatments made for vine weevil to control pests. You can also pick off adult weevils from leaves by hand. Do this during warm months when they’re most active.
Here’s a checklist to avoid and fix bulb problems in pots:
- Use pots with drainage holes and peat-free compost to prevent rot.
- Plant bulbs at the right depth, usually twice as deep as their size.
- Keep watering steady but avoid waterlogging the soil.
- Give pots enough sunlight, ideally at least 6 hours daily.
- Check bulbs before planting for firmness and mold signs.
- Apply nematodes in spring or autumn for vine weevil control.
- Remove decayed bulbs promptly to stop rot spreading.
A pot full of healthy bulbs shows firm leaves and blooms on time. Check your watering and light if flowers are slow or missing. Proper care often fixes these growth problems.
For pests, early nematode use and removing adult weevils helps control damage. Rot stops new growth fast, so quick action saves other bulbs in the pot.
Tips for Layering and Grouping Bulbs to Maximize Blooms
Yes, you can plant different bulbs in layers in one pot to stretch the flowering period. Grouping bulbs with staggered bloom times offers color from early spring to late. Use pots at least 12 inches deep for layered or grouped bulbs.
Choosing Compatible Bulbs for Layering
Select bulbs that bloom at different times to get continuous flowers. Mix large bulbs like tulips and smaller ones like crocuses. Also, pick bulbs with similar water and light needs to keep care simple.
For example, pair early-flowering crocus with mid-season daffodils and late tulips. Choose colors that match or contrast nicely, like deep blue, white, and yellow. This creates a lively display without overcrowding.
Planting Multiple Layers Safely
Start with the largest and deepest bulbs at the bottom, around 6 to 8 inches down. Place medium-sized bulbs 3 to 4 inches deep in the soil.
Put small bulbs just under the soil surface. This helps each bulb grow without competing for space or nutrients.
Use loose, well-drained soil and water lightly after each planted layer. Avoid packing soil too hard, or bulbs may struggle to sprout. Moving from big to small bulbs preserves root space and encourages strong growth.
Estimating Bulb Quantities per Pot Size
Plant about five to seven mid-size bulbs in a standard 12-inch (30 cm) pot. Smaller pots need fewer bulbs, three to five in 8-inch pots works best. Large grouping pots can hold 25 to 50 bulbs but need frequent watering and good soil.
Group bulbs tightly but keep 2 to 3 inches between each to avoid root crowding. The right number fills the pot visually and reduces empty patches as bulbs grow. Layered pots need extra soil depth, about 15 to 20 cm, for healthy roots.
The following steps explain how to plant bulbs in layers or groups:
- Choose a large pot that drains well and is at least 12 inches deep.
- Pick bulbs with staggered bloom times and compatible growing needs.
- Add a 2-inch layer of soil at the bottom of the pot.
- Plant the largest bulbs first, spacing them evenly on the soil.
- Cover with 2 to 3 inches of soil, then add the medium bulbs.
- Cover again, and place the smallest bulbs near the top.
- Fill the pot with soil, leaving about one inch below the rim.
- Water lightly and place the pot in a cool, shaded spot until growth starts.
Don’t overcrowd bulbs or they may not bloom well; allow enough space for roots.
Step-by-Step Action Plan for Planting Bulbs in Pots
Get your bulbs growing fast with this simple plan. Follow each step to watch your container bulbs bloom well.
- Before Planting: Choose bulbs suited for pots and pick a pot with good drainage. Check the pot holes to avoid water buildup.
- Day 1: Add a 2-inch layer of gravel or small stones at the pot bottom. This keeps roots from sitting in water.
- Day 1: Fill pot halfway with loose potting mix. Place bulbs with pointed ends up, spaced evenly. Cover with soil, leaving about one inch at the top.
- Day 2: Water the soil well until it drains out the pot bottom. Soil should feel moist, not soggy.
- Week 1: Put the pot where bulbs get the right chill. Move it indoors if you want to force growth. Do this as needed. Watch for any shoots starting.
- Weeks 2-4: Check moisture weekly, watering only when soil feels dry. Avoid letting bulbs sit in water.
- After Blooming: Cut back faded flowers and feed bulbs lightly with a balanced fertilizer. Keep pots in bright light as leaves die back.
Frequently Asked Questions
How Do I Choose Soil for Planting Bulbs in Pots?
Use moist, humus-rich, loam-based compost to support bulb growth. It holds water but drains well to prevent rot in pots.
Can I Plant Bulbs in Pots Indoors Before Outdoor Planting Time?
Yes, you can force bulbs indoors with cold exposure for about 10 weeks. This simulates winter and helps bulbs bloom early inside.
Should I Water Bulbs Right After Planting in Pots?
Water the bulbs well after planting to settle soil around roots. Avoid overwatering to prevent bulb rot. Check moisture regularly.
Can I Mix Different Types of Bulbs in One Pot?
Yes, but choose bulbs with similar growing needs and bloom times. Mixing bulbs that bloom together improve pot display and care routines.
How Deep Should I Plant Bulbs in Pots Compared to the Garden?
Plant bulbs about three times their height deep in pots, similar to garden depth. Some pots may suit slightly shallower planting for spring bulbs.
What Do I Do If I See Mold on Soil or Bulbs in Pots?
Mold means poor drainage or overwatering. Improve air circulation, reduce water, and repot bulbs in fresh compost if needed.
Key Points to Remember
Growing bulbs in pots brings color right to your porch or balcony. Start by picking bulbs that fit your space and climate. Try planting a pot today to see your first blooms soon.